When you register domain names with UK-Cheapest.co.uk, we give you full control over the management of your domain DNS records.
With our advanced web based DNS Manager, you can configure your domain names to function with any hosting provider or server of your choice.
We provide the DNS Manager web interface at no additional cost with every domain name. There are no future or annual costs for this service whatsoever. Period.
Modify your domain DNS records to associate your domain with your blog or externally hosted website. Your host will provide you with comprehensive details showing how to set your domain DNS to connect to their servers.
 Which DNS records can be changed?
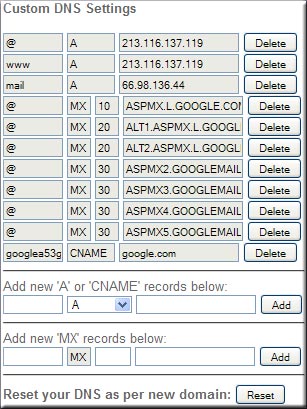
You can freely add or delete all A, MX, TXT (SPF) and CNAME records for your domain. The records are added in realtime, there is no delay to your record changes being submitted to the server.
All DNS changes are subject to a propagation delay – this is the time it takes for the new records to be recognised by the global internet name servers.
What is the cost for this DNS service?
The DNS Manager feature is provided at no additional cost with all domain names. This is a totally all inclusive DNS service. Unlimited changes, unlimited records, absolutely no costs.
For more assistance visit the Domain Help Sheet. If you have problems setting up your domain DNS records simply review our Online Help Centre resources or contact ourHelpdesk.
