Adding an SSL Certificate to your hosting service could not be easier. You don’t need to worry about the technicalities of generating a Certificate Signing Request (CSR) or even installing the certificate, we do all of that for you. All you need to do is order the certificate.
When you register a new domain name, often one of the first things you want to do is to connect it to your web hosting service. Usually your web host will provide name servers.
Until you change the name servers on your domain name, your domain will be parked and you will be able to use any of the parking features which come with every domain name.
Locating the Nameserver tab for your domain
Changing your domain nameservers is easy. You can change them as often as you need.
To change your domain nameservers, simply follow these steps:
Login to your Client Area and go to Domains > My Domains
Click Manage on the desired domain name
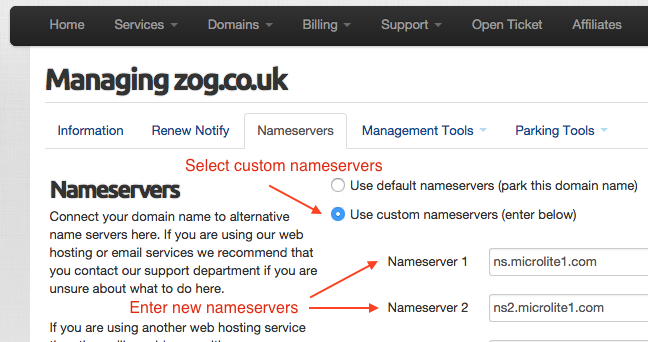
Click Nameservers tab
Select Use Custom Nameservers
Enter at least two different name servers
Press Change Nameservers button
Any nameserver changes can take up to 24 hours to fully propagate across the global internet so do not expect instant results in your web browser.
Enabling compression features on your website can vastly increase the performance of your website.
This occurs by instructing the server to compress data sent to the browser. The browser then proceeds to decompress the data it receives.
This reduces the amount of data physically sent to your client browser resulting in a shorter data transfer time. It’s actually very easy to implement. Data transfer can be reduced by more than 80% overall.
Add the following instructions to the bottom of your .htaccess file in your website document root folder.
Which PHP Modules are included in our Shared Hosting Plans?
It is essential to have the right PHP modules installed in order to get the most out of the most recent web applications such as WordPress, Magento, Drupal and many others.
As standard, the following PHP modules are installed for all accounts:
php-mbstring
php-gd
php-5.4
php-pdo
php-bcmath
php-imap
php-devel
php-cli
php-soap
php-xml
php-mysql
php-common
php-mcrypt
If you require a module that is not listed here, simply submit a ticket to the helpdesk and we can usually arrange for it to be installed for you – at no additional cost as always.
Upgrade your Hosting Plan to UK-Cheapest “Unlimited”
It’s not always possible to know how much storage you need, nor is it easy to calculate how to allocate resources between your hosting plan features. It is for this reason we offer “Unlimited”, a plan with no set limits on traffic, bandwidth, mailboxes or storage.
Never again worry about filling up a mailbox, running out of web storage or needing another MySQL database. “Unlimited” is the ULTIMATE shared hosting plan for any growing business – there’s no need to know your web resource requirements in advance.
“Unlimited” is the perfect plan for your Business and for anyone who takes their online web presence seriously. Upgrading your account is easy and instant. Login to your Client Area and upgrade today!
What exactly does “Unlimited” mean?
Unlimited means that there is no set limit on the disk space or bandwidth that your site uses. The unlimited shared hosting plan is designed for small business use, or personal use. Heavy resources users, in terms of disk space, bandwidth, cpu and memory will be advised to consider suitable upgrade paths to dedicated, VPS or cloud servers. These plans are not suitable for storage of private files or file sharing or for users attempting to resell or host large numbers of unrelated websites.