How to: Setup POP using Microsoft Office Outlook 2016

This guide is for setting up POP in Outlook 2016, POP is recommended if you will be checking mail on one device and wish to store copies of mail on the device and not on server.

If you will be checking mail on multiple devices please follow the link below to view our Outlook 2016 IMAP guide:

Outlook 2016 IMAP setup guide

To setup a POP account:

  1. Open Microsoft Office Outlook 2016
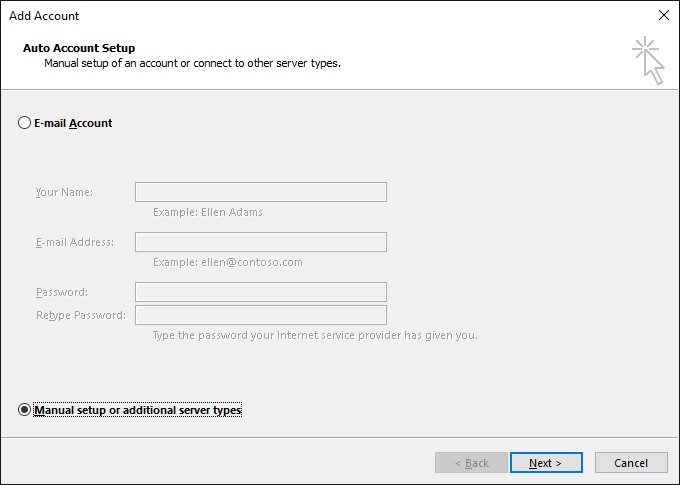
  2. Go to File > Info > Add Account
  3. Select the checkbox Manual setup or additional server types. Click Next.

Outlook 2016 Step 3

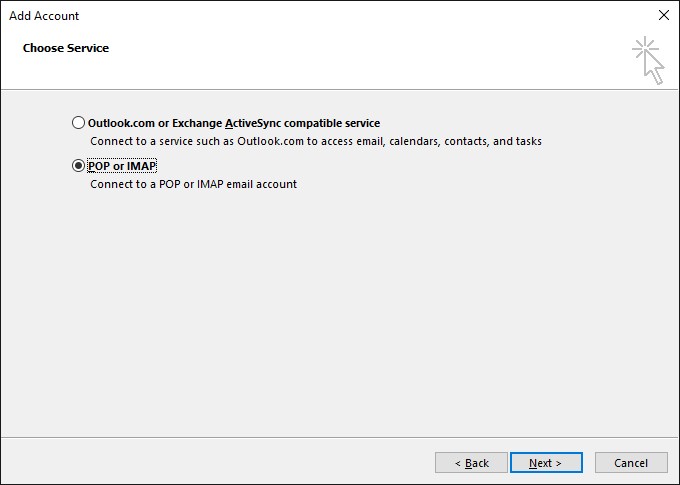
  1. Select the Option POP or IMAP and hit Next.

step 4

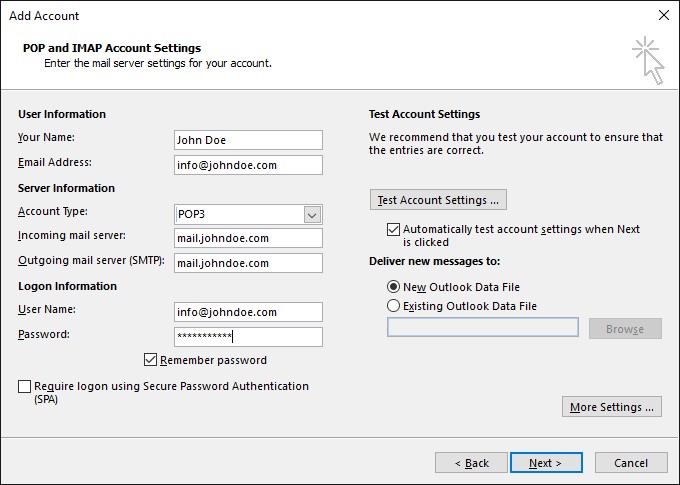
  1. Specify the following:
  • Your name.
  • The email address that you are setting up the POP account for.
  • Account Type: POP3
  • Incoming mail server: Enter mail.yourdomainname.com, for example if your domain name is johndoe.com please enter mail.johndoe.com.
  • Outgoing mail server: Enter mail.yourdomainname.com, for example if your domain name is johndoe.com please enter mail.johndoe.com.
  • User Name: Specify your full email address. Example: info@johndoe.com.
  • Password: This will be the password that you set when creating the mail account in Plesk, it is the password that you use to login to RoundCube webmail.
  • Require logon using Secure Password Authentication (SPA). Leave this option cleared.

step 5

  1. Click More Settings, open the Outgoing Server tab and check My outgoing server (SMTP) requires authentication.

Step 6

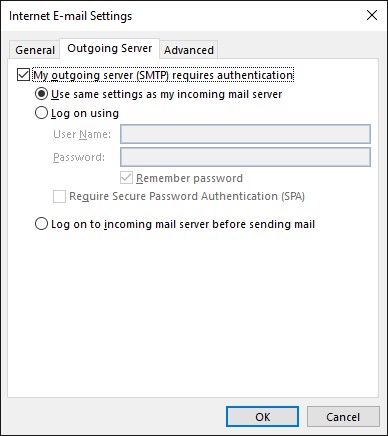
  1. Open the Advanced tab and enter 587 as Outgoing Server (SMTP) port. Click OK and Click Next to complete the setup.

step 7


Priority Server Upgrade: MICROLITE8

Scheduled for weekend 5/6 September 2015

We are pleased to announce that MICROLITE8 is being upgraded to our new UKC Super Server high performance hardware range this coming weekend. We are rolling this new model out across the entire range during the latter half of 2015.

During the weekend 5/6 September, we will be migrating all client data from the current hardware (5.77.60.33) to completely new hardware (5.77.38.140).

There will be no downtime for your web sites or email services. We will switch the new server into production only after it has passed our comprehensive data migration and validation testing.

Notice: Please refrain from making significant changes to your web site during this period. The migration of the data will take many hours. We request that you put off any changes until the upgrade is complete to avoid an inconsistent transfer of your site and data.

Thank you for your patience,

UPDATE: Monday 06:30

The migration of all MICROLITE8 accounts to UKC05 Super Server is complete.

UKC05 has fully “absorbed” MICROLITE8. The new Plesk URL and name servers for MICROLITE8 accounts are:

Plesk Panel: https://ukc05.uk:8443 (replaces https://www.microlite8.com:8443)

Name servers:

  • ns.ukc05.uk (replaces ns.microlite8.com)
  • ns2.ukc05.uk (replaces ns2.microlite8.com)

Please note the following:

  • The old Plesk server name MICROLITE8.COM and old name servers ns.microlite8.com and ns2.microlite8.com will continue to function as normal.
  • There is no urgent need to change all the name servers on your domain names however we recommend using the new name servers for good housekeeping purposes.
  • Using the old MICROLITE8 Plesk URL may give a security error in your browser which you can safely ignore.
  • The server IP address has changed from 5.77.60.33 to 5.77.38.140
  • If you have any problems, we can remigrate you account from the old server again upon request. Simply log a ticket and ask for a re-migration of your account from MICROLITE8 with your domain name. Your account as it stood at 06:30 Monday will be re-migrated.

We hope you enjoy the enhanced performance and security of your new UKC Super Server!

Priority Server Upgrade: MICROLITE3

Scheduled for weekend 22/23 August 2015

We are pleased to announce that MICROLITE3 is being upgraded to our new UKC Super Server high performance hardware range this coming weekend. We are rolling this new model out across the entire range during the latter half of 2015.

During the weekend 22/23 August, we will be migrating all client data from the current hardware (5.77.60.44) to completely new hardware (5.77.35.249).

There will be no downtime for your web sites or email services. We will switch the new server into production only after it has passed our comprehensive data migration and validation testing.

Notice: Please refrain from making significant changes to your web site during this period. The migration of the data will take many hours. We request that you put off any changes until the upgrade is complete to avoid an inconsistent transfer of your site and data.

Thank you for your patience,

UPDATE: Sunday 20:30

The migration of all MICROLITE3 accounts to UKC03 Super Server is complete.

UKC03 has fully “absorbed” MICROLITE3. The new Plesk URL and name servers for MICROLITE3 accounts are:

Plesk Panel: https://ukc03.uk:8443 (replaces https://www.microlite3.com:8443)

Name servers:

  • ns.ukc03.uk (replaces ns.microlite3.com)
  • ns2.ukc03.uk (replaces ns2.microlite3.com)

Please note the following:

  • The old Plesk server name MICROLITE3.COM and old name servers ns.microlite3.com and ns2.microlite3.com will continue to function as normal.
  • There is no urgent need to change all the name servers on your domain names however we recommend using the new name servers for good housekeeping purposes.
  • Using the old MICROLITE3 Plesk URL may give a security error in your browser which you can safely ignore.
  • The server IP address has changed from 5.77.60.44 to 5.77.35.249
  • If you have any problems, we can remigrate you account from the old server again upon request. Simply log a ticket and ask for a re-migration of your account from MICROLITE3 with your domain name. Your account as it stood at 20:00 Sunday will be re-migrated.

We hope you enjoy the enhanced performance and security of your new UKC Super Server!

How to Setup a Newsletter using Mailman

emailHow to make an “Announce Only” Newsletter Mailing List

Mailman is developed to be a listserv discussion tool. This means by default anyone can post to the list and everyone gets the replies. However, most often, you just want to setup a mailing list that only one person can post to and everyone else gets a copy of the email. A classic one-way Newsletter setup.

Login to your Mailing list

Login to your your list: eg. http://www.yourdomain.com/mailman/admin/yourlistname
Enter the list administrative password and click the “Let me in” button.

Configure the following settings

  • Privacy Options >> Subscription Rules
  • Who can view subscription list? (List admin only)
  • Privacy Options >> Sender Filters
  • By default, should new list member postings be moderated? (Yes)
  • Action to take when a moderated member posts to the list. (Hold)
  • Action to take for postings from non-members for which no explicit action is defined. (Hold)

Auto-responder settings

  • Should Mailman send an auto-response to mailing list posters? (Yes)
  • Auto-response text to send to mailing list posters: “Sorry, only the site administrator can post to this list.”
  • Number of days between auto-responses: (0)
  • Membership Management >> Membership List
  • Set everyone’s moderation bit, including those members not currently visible (On)

Now that everyone has their moderation bit on (which means their posts are subject to moderator approval) and “Action to take when a moderated member posts to the list” is Hold, the administrator will have to approve their own posts.

You could turn off the moderation bit for moderators’ email addresses, but this is not very secure because email addresses can be easily forged.

You can customise these settings as you like, but to prevent unauthorised people from posting to you list, always have their moderation bit(flag) on.

You should always keep “By default, should new list member postings be moderated?” set to “Yes” so new members are also moderated.

Refunds and Cancellations

Site Builder / Web Hosting Refund Policy

100-blueWe care deeply about the satisfaction received by every customer. With this in mind, we offer a no quibble 30 day refund policy for all web hosting and site builder related services.

There are a number of reasons why you may require a refund and cancellation for your hosting or webspace account. Sometimes things just don’t work out.

Maybe you don’t require hosting – or didn’t understand what you were buying? Maybe you find it all too complicated and have decided to hire a web designer to do it all for you instead?

Or just maybe you don’t like the control panel or maybe just something else, anything else. But… Don’t worry – our unconditional 30 day refund policy is very easy to activate!

What we cannot refund.

Let’s get to the nitty gritty. We cannot refund for domain name registrations. We simply cannot cancel them once they are registered so there is no backing out of domain names, now that’s that hard stuff out of the way!

We can pretty much refund for anything else as long as you are within your 30 days, after that it is up to the discretion of the management – and they are pretty good as long as you have a valid reason, we don’t want unhappy customers, we don’t believe in making you stay with us if you don’t want to!

To action your refund request…

This is the simple part. Go to the eSupport HelpDesk, raise a support ticket asking for a refund on your particular product, provide your order number and for speed of execution if there is a domain name involved, mention that you understand that it cannot be refunded.

The HelpDesk will then action your refund with NO FURTHER QUESTIONS!