Custom Domain Email – Mailbox Support & Setup Guide

1. What is a Custom Domain Email Address / Mailbox?

Custom Domain Email Address (or mailbox) is an email account that uses your own website’s domain name instead of a generic email provider like Gmail or Yahoo. For example, instead of john.doe@gmail.com, you would have john.doe@yourdomain.co.uk.

This mailbox lets you send and receive emails using your custom domain, giving you greater control and professionalism.

How is this different from full email hosting?

A mailbox provided with your domain offers basic email capabilities, typically accessed via webmail or configured in email clients using POP or IMAP protocols. Full email hosting services usually provide additional features like calendars, contacts, advanced spam filtering, and larger storage limits.

Why use a domain email address?

  • Professionalism: Using a custom domain email looks more credible and trustworthy to your clients and contacts.
  • Branding: Every email you send promotes your brand and reinforces your online presence.
  • Control: You manage your email addresses and accounts, not a third-party free provider.
  • Customisation: Create personalised addresses like sales@yourdomain.co.uk or info@yourdomain.co.uk tailored to your business needs.

2. How to Get a Mailbox?

If you have a parked domain using our default nameservers, you’re eligible for a custom domain mailbox.

To get your mailbox:

  1. Log in to your Client Area.
  2. Navigate to Domains and select the domain name you want to use.
  3. In the sidebar menu, click on Custom Domain Email.
  4. Choose your desired mailbox product (Basic, Standard, or Pro).
  5. Follow the prompts to create your mailbox and set your mailbox name (prefix) and password.
  6. Once created, you can access your mailbox via Roundcube Webmail or configure it in your email client.

If you don’t see the option, ensure your domain is parked with our nameservers. Contact support if you need assistance.

3. How to Access Your Mailbox

You can access your custom domain mailbox in several convenient ways:

Using Roundcube Webmail

Access your mailbox directly from any web browser without needing to configure anything.

  • Webmail URL: https://webmail.ukc.uk
  • Enter your full email address (e.g., john.doe@yourdomain.co.uk) and password to log in.
  • Once logged in, you can send, receive, and manage your emails from anywhere with internet access.

Using Third-Party Email Clients

We recommend using Roundcube Webmail to send and receive emails through your mailbox, however, if you are up for the technical challenge then you might prefer to use unsupported desktop or mobile email applications like Microsoft Outlook, Thunderbird, or Apple Mail, you can configure them with the following settings:

  • Incoming Mail Server (IMAP): microlite1.com
    • Port: 993 (SSL/TLS)
  • Incoming Mail Server (POP3): microlite1.com
    • Port: 995 (SSL/TLS)
  • Outgoing Mail Server (SMTP): Use your Internet Service Provider’s SMTP server
  • Username: Your full mailbox name (e.g., john-doe-yourdomain-co-uk)
  • Password: Your mailbox password

Note: IMAP keeps your emails synced across all devices, while POP downloads emails to your device.

Mobile Access Tips

  • Use the built-in mail apps on your iPhone, Android, or tablet.
  • Enter the same server settings as above for IMAP or POP.
  • For quick access without setup, simply use Roundcube webmail via your mobile browser.

4. Setting or Resetting Your Mailbox Password

How to Change Your Mailbox Password

You can easily change your mailbox password anytime through your client area:

  1. Log in to your Client Area.
  2. Navigate to Domain Management and select your domain.
  3. Find the Mailbox or Custom Domain Email section.
  4. Use the provided option to set a new password for your mailbox.
  5. Save your changes – your new password will be effective immediately.

Password Requirements and Tips for Security

To keep your mailbox secure, your password must:

  • Be at least 8 characters long (maximum 16 characters).
  • Include at least one uppercase letter, one lowercase letter, and one number.
  • Not contain spaces or special invisible characters.
  • Avoid common or easily guessed passwords (e.g., “password123”).

Security Tips:

  • Use a unique password that you don’t use elsewhere.
  • Avoid using personal information like birthdays or names.
  • Change your password regularly to maintain security.

5. Mailbox Storage and Limits

Mailbox Sizes by Product Type

Each mailbox plan offers a different amount of storage to suit your needs:

  • Basic Mailbox: 1GB of storage – ideal for light email use.
  • Standard Mailbox: 5GB of storage with added spam protection – perfect for most small businesses.
  • Pro Mailbox: 10GB of storage with priority support – great for heavy email users and professionals.

What Happens If Your Mailbox Fills Up?

If your mailbox reaches its storage limit:

  • You may stop receiving new emails until you free up space by deleting old messages.
  • Some incoming emails might bounce back to the sender with a notification that your mailbox is full.
  • You will not be able to send emails until you free up space or upgrade your plan.

How to Upgrade Storage

If you find your mailbox storage isn’t enough:

  1. Log in to your Client Area.
  2. Navigate to your domain’s mailbox product.
  3. Choose an upgrade option to a higher storage plan.
  4. Complete the upgrade process – your storage will increase immediately or within a few minutes.
  5. Contact support if you need assistance with upgrading.

6. Spam Protection and Security

Spam Filtering with SpamAssassin

To help keep your mailbox clean and free from unwanted junk emails, we use SpamAssassin, a powerful spam filtering system running on our mail servers.

  • Incoming emails are automatically scanned and scored for spam-like characteristics.
  • Emails identified as spam are marked or moved to a spam/junk folder, helping you focus on important messages.

Malware Scanning with Maldet

In addition to spam filtering, we employ Maldet (Malware Detect) to scan all email attachments for malware and viruses.

  • Suspicious or harmful attachments are flagged or blocked to protect your device and data.

How to Report Spam or Phishing Emails

If you receive a suspicious email that bypasses the filters:

  • Do not open attachments or click links in the email.
  • Forward the email to our support team at abuse@uk-cheapest.co.uk with the subject “Spam/Phishing Report.”
  • Delete the email from your mailbox after reporting.

7. Configuring Email Forwarding

How to Forward Emails from Your Domain Email Address

If you have a parked domain using our default nameservers, you can easily forward emails sent to your domain’s aliases to any external mailbox of your choice. This is perfect if you want emails addressed to info@yourdomain.co.uk or sales@yourdomain.co.uk to be redirected to your main mailbox or another email account.

To set up email forwarding:

  1. Log in to your Client Area.
  2. Navigate to the domain management section for your parked domain.
  3. Locate the Email Forwarding section.
  4. Add or edit forwarding aliases by specifying the prefix (alias) and the destination email address.
  5. Save your changes – forwarding is typically active within minutes.

Limitations and Best Practices

  • There are no limits on the number of forwarding aliases you can create. Feel free to set up as many as you need.
  • Choose aliases carefully to minimise spam. Generic aliases like info or admin tend to attract more unsolicited mail.
  • Regularly review and update your forwarding rules to keep them relevant.
  • Forwarded emails depend on the external mailbox’s availability and configuration; ensure your destination mailbox is functioning correctly.

Email Forwarding: Stay Connected, Stay Professional


What is Email Forwarding?

Email forwarding lets you automatically redirect emails sent to any address at your domain (like info@yourdomain.uk) to your preferred external email account (like yourname@gmail.com or sales@outlook.com). With UK Cheapest, you can set up unlimited forwarding aliases – free with every domain.

Why Use Email Forwarding?

  • Brand Your Email: Use a professional address on your domain for your business, portfolio, or side project—even if you use Gmail, Outlook, or another provider.
  • Centralise Your Inbox: Collect messages from multiple aliases or domains in one inbox, so you never miss important emails.
  • Protect Your Privacy: Give out forwarding aliases on your website, forms, or to contacts – change or remove them anytime to control unwanted mail.
  • Easy Setup, No Mailbox Needed: No need to manage a separate mailbox; all mail arrives at your chosen account.

Tips for Reducing SPAM

  • Choose Unique Aliases:Avoid generic addresses like info@yourdomain.uk or contact@yourdomain.uk—these tend to attract more spam.Use personalised or unique aliases such as john.smith@yourdomain.uk or sales.team@yourdomain.uk for better results.

How to Set Up Email Forwarding

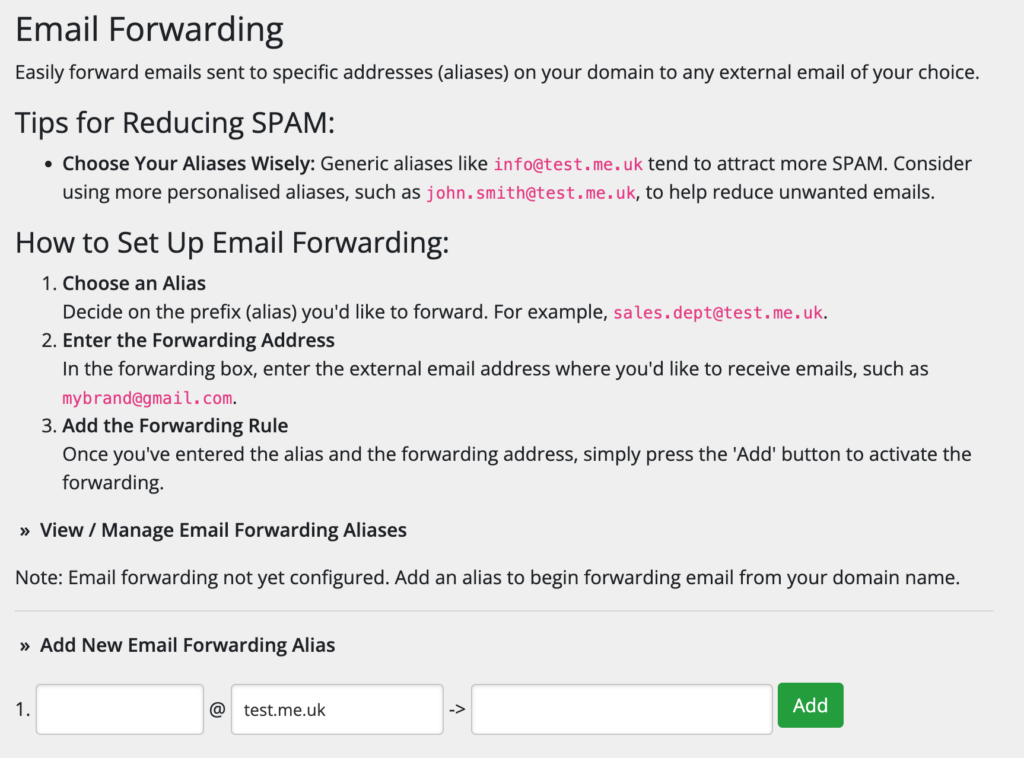
  1. Choose Your Alias:Decide which address on your domain you want to forward (e.g., sales@yourdomain.uk or you@yourdomain.uk).
  2. Enter the Forwarding Address:Type the email address where you’d like to receive mail—this can be Gmail, Outlook, Yahoo, or any email account you prefer.
  3. Add the Forwarding Rule:Click “Add” to activate the forwarding. All emails sent to your alias will instantly arrive at your chosen destination.

You can add as many forwarding aliases as you need – and remove or edit them at any time from your control panel.

Set up new forwarding rules quickly – just enter your alias, your forwarding address, and click Add!

Frequently Asked Questions

Can I create multiple forwarding aliases?

Yes! Add as many aliases as you like for your domain. Forward emails to one or several addresses.

Does this service store my emails?

No, email forwarding simply redirects your messages – your inbox is wherever you set as the destination (like Gmail, Outlook, etc.).

Can I turn off or change forwarding later?

Yes—manage, edit, or delete forwarding rules any time through your control panel.

Will my emails be filtered or delayed?

Forwarded mail usually arrives within seconds, but may be subject to your destination mailbox’s spam filters or rules.

Is email forwarding included with all domains?

Yes! Every domain registered with UK Cheapest includes unlimited free email forwarding.

Get Started Today

Set up professional email forwarding in seconds, all managed from your UK Cheapest account.

Need a full-featured mailbox with storage and advanced features? Explore our Professional Email Hosting for more options.

What are the 5 most popular email clients?

As of December 2023, the five most popular email clients were:

Microsoft Outlook: Widely used in the corporate world due to its integration with Microsoft Office Suite and advanced organizational capabilities. It offers a range of features including calendar, task management, and contact management. The official website for Microsoft Outlook is https://outlook.live.com/. This site is used for accessing Outlook as a webmail service. For more information about the Outlook application that’s part of the Microsoft Office Suite, you would visit https://www.microsoft.com/en-us/microsoft-365/outlook/email-and-calendar-software-microsoft-outlook.

Gmail: Google’s free email service, popular for its user-friendly interface and seamless integration with other Google services like Google Drive, Calendar, and Meet. It’s known for its robust spam filtering and substantial free storage space. The official website for Gmail, which is Google’s email service, is https://mail.google.com/. This URL takes you directly to the Gmail inbox if you’re already logged in, or to the login page if you’re not.

Apple Mail: The default email client for macOS and iOS devices. It’s popular among Apple product users for its simplicity, integration with iCloud, and synchronization across all Apple devices. Apple Mail is an application that comes pre-installed on Apple devices, so it doesn’t have a dedicated URL like web-based email services. For more information about Apple Mail, you can visit Apple’s official support page at https://support.apple.com/mail.

Yahoo Mail: Known for its large storage capacity and robust search capabilities. It offers a user-friendly interface and is integrated with Yahoo’s other services. The official website for Yahoo Mail is https://mail.yahoo.com/. This is where you can log in to your Yahoo email account, or get more information about the service.

Thunderbird: A free and open-source email client developed by the Mozilla Foundation. It’s known for its customization options, strong security features, and support for various add-ons. As a free and open-source email client, the official website for Mozilla Thunderbird is https://www.thunderbird.net/. This site provides download links for the software, as well as additional information and support resources.

These clients vary in terms of features, interface, and integration capabilities, catering to different user needs and preferences. The popularity of these email clients can vary based on the region and specific user groups.

Beginners Guide: What is Email Forwarding?

Imagine you’ve moved to a new house and you want all your mail to be sent there instead of your old address. Wouldn’t it be convenient if the post office could automatically send all your mail to your new address? Well, in the digital world, something very similar exists for emails, and it’s called email forwarding.

Email Forwarding: The Basics

Email forwarding is a process in which an email sent to one email address is automatically sent (or “forwarded”) to another email address. This is particularly useful in various situations, both personal and professional.

Let’s simplify this with an example. Suppose you have an old email address, oldemail@example.com, that all your contacts use. But now, you’ve created a new email address, newemail@example.com, which you prefer to use. Instead of checking two email accounts, you can set up email forwarding. This means any emails sent to oldemail@example.com will automatically arrive at newemail@example.com.

Why Use Email Forwarding?

  1. Convenience: Managing multiple email accounts can be time-consuming. Email forwarding brings emails from various addresses to a single inbox, saving you time and hassle.
  2. Professionalism: For businesses, having emails from different departments (like sales@example.com, support@example.com) forwarded to one place can streamline communication and ensure no message is missed.
  3. Transition: If you’re changing your email address, email forwarding ensures you don’t miss any important emails sent to your old address.
  4. Spam Prevention: Sometimes, you might not want to give out your primary email address (to sign up for a newsletter, for instance). You can use an alternate address and have those emails forwarded to your main account. This can help in keeping your primary inbox less cluttered and more secure.

How Does Email Forwarding Work?

Setting up email forwarding is usually a straightforward process. You can typically find the option in the settings or options menu of your email service. Here’s a general step-by-step guide:

  1. Log into the email account you want to forward messages from.
  2. Find the Settings or Options menu.
  3. Look for a section labeled “Forwarding,” “Email Forwarding,” or something similar.
  4. Enter the email address you want your messages forwarded to.
  5. Save your changes.

It’s important to note that the steps may vary slightly depending on your email provider.

Types of Email Forwarding

  1. Manual Forwarding: You manually select individual emails to forward. This is useful for sharing specific emails but is not automated.
  2. Automatic Forwarding: All incoming emails are automatically forwarded. This is the most common type of forwarding used for the scenarios described earlier.

Considerations and Best Practices

  • Check Your Forwarded Emails Regularly: Ensure your forwarding is working correctly and that important emails aren’t getting lost or marked as spam.
  • Inform Your Contacts: If you’re transitioning to a new email address, inform your contacts about the change.
  • Security: Be cautious about where you’re forwarding your emails. Ensure the forwarding address is secure and trusted.

In conclusion, email forwarding is a simple yet powerful tool that can make managing your emails much easier. Whether it’s for personal use or for your business, it can save time, enhance organisation, and ensure that you stay on top of your communications without the need to juggle multiple inboxes.

How to: Setup IMAP using Microsoft Office Outlook 2016

This guide is for setting up IMAP in Outlook 2016 to access your mail, IMAP is recommended if you are checking mail on multiple devices and wish to store your mail on the server.

If you will be checking mail on one device and wish to store copies of mail on your device and not on the server please follow the link below to view our guide on how to setup POP in Outlook 2016:

Outlook 2016 POP setup guide

  1. Open Microsoft Office Outlook 2016
  2. Go to File > Info > Add Account
  3. Select the checkbox Manual setup or additional server types. Click Next.

Outlook 2016 Step 3

  1. Select the option POP or IMAP and hit Next.

step 4

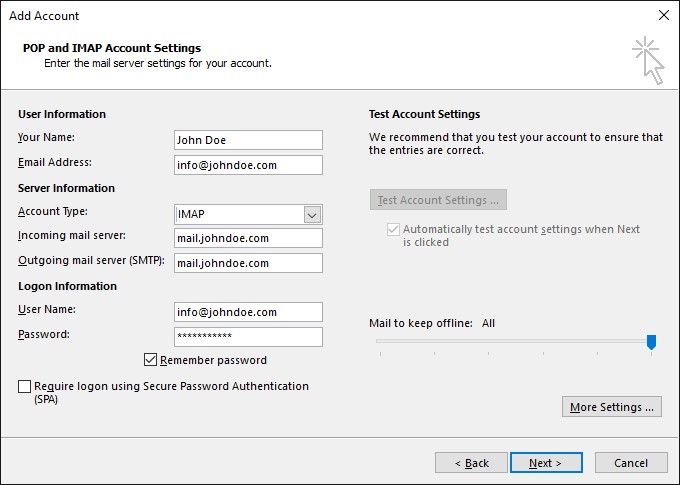
  1. Specify the following:
  • Your Name.
  • The email address that you are setting up the IMAP account for.
  • Account Type: IMAP
  • Incoming mail server: Enter mail.yourdomainname.com, for example if your domain name is johndoe.com please enter mail.johndoe.com.
  • Outgoing mail server: Enter mail.yourdomainname.com, for example if your domain name is johndoe.com please enter mail.johndoe.com.
  • User Name: Specify your full email address. Example: info@johndoe.com.
  • Password: This will be the password that you set when creating the mail account in Plesk, it is the password that you use to login to RoundCube webmail.
  • Require logon using Secure Password Authentication (SPA). Leave this option cleared.

step 5 imap

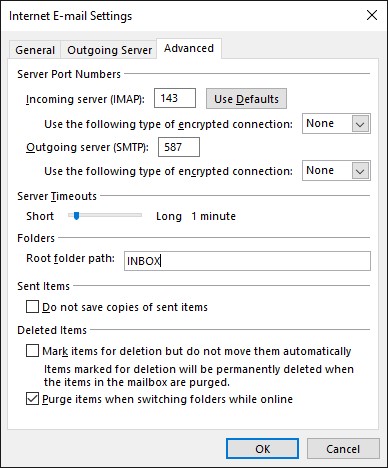
  1. Click More Settings, open the Outgoing Server tab and check My outgoing server (SMTP) requires authentication.

Step 6

  1. Open the Advanced tab and enter 587 as Outgoing Server (SMTP) port and INBOX as the Root folder path. Click OK and Click Next to complete the setup.

step 7 imap