Custom Domain Email – Mailbox Support & Setup Guide

1. What is a Custom Domain Email Address / Mailbox?

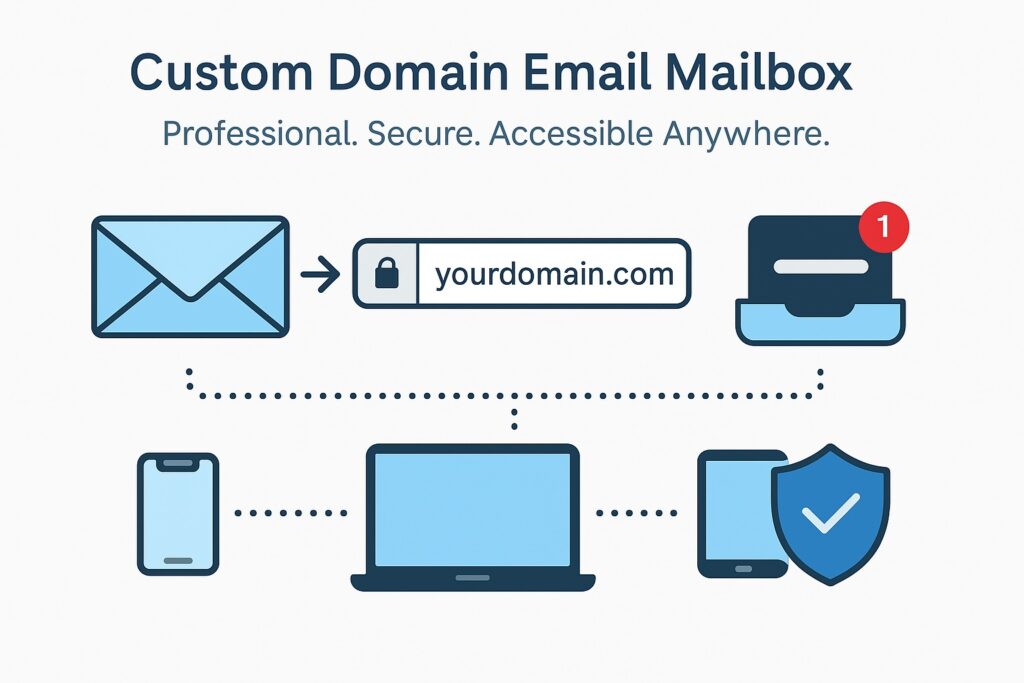
Custom Domain Email Address (or mailbox) is an email account that uses your own website’s domain name instead of a generic email provider like Gmail or Yahoo. For example, instead of john.doe@gmail.com, you would have john.doe@yourdomain.co.uk.

This mailbox lets you send and receive emails using your custom domain, giving you greater control and professionalism.

How is this different from full email hosting?

A mailbox provided with your domain offers basic email capabilities, typically accessed via webmail or configured in email clients using POP or IMAP protocols. Full email hosting services usually provide additional features like calendars, contacts, advanced spam filtering, and larger storage limits.

Why use a domain email address?

  • Professionalism: Using a custom domain email looks more credible and trustworthy to your clients and contacts.
  • Branding: Every email you send promotes your brand and reinforces your online presence.
  • Control: You manage your email addresses and accounts, not a third-party free provider.
  • Customisation: Create personalised addresses like sales@yourdomain.co.uk or info@yourdomain.co.uk tailored to your business needs.

2. How to Get a Mailbox?

If you have a parked domain using our default nameservers, you’re eligible for a custom domain mailbox.

To get your mailbox:

  1. Log in to your Client Area.
  2. Navigate to Domains and select the domain name you want to use.
  3. In the sidebar menu, click on Custom Domain Email.
  4. Choose your desired mailbox product (Basic, Standard, or Pro).
  5. Follow the prompts to create your mailbox and set your mailbox name (prefix) and password.
  6. Once created, you can access your mailbox via Roundcube Webmail or configure it in your email client.

If you don’t see the option, ensure your domain is parked with our nameservers. Contact support if you need assistance.

3. How to Access Your Mailbox

You can access your custom domain mailbox in several convenient ways:

Using Roundcube Webmail

Access your mailbox directly from any web browser without needing to configure anything.

  • Webmail URL: https://webmail.ukc.uk
  • Enter your full email address (e.g., john.doe@yourdomain.co.uk) and password to log in.
  • Once logged in, you can send, receive, and manage your emails from anywhere with internet access.

Using Third-Party Email Clients

We recommend using Roundcube Webmail to send and receive emails through your mailbox, however, if you are up for the technical challenge then you might prefer to use unsupported desktop or mobile email applications like Microsoft Outlook, Thunderbird, or Apple Mail, you can configure them with the following settings:

  • Incoming Mail Server (IMAP): microlite1.com
    • Port: 993 (SSL/TLS)
  • Incoming Mail Server (POP3): microlite1.com
    • Port: 995 (SSL/TLS)
  • Outgoing Mail Server (SMTP): Use your Internet Service Provider’s SMTP server
  • Username: Your full mailbox name (e.g., john-doe-yourdomain-co-uk)
  • Password: Your mailbox password

Note: IMAP keeps your emails synced across all devices, while POP downloads emails to your device.

Mobile Access Tips

  • Use the built-in mail apps on your iPhone, Android, or tablet.
  • Enter the same server settings as above for IMAP or POP.
  • For quick access without setup, simply use Roundcube webmail via your mobile browser.

4. Setting or Resetting Your Mailbox Password

How to Change Your Mailbox Password

You can easily change your mailbox password anytime through your client area:

  1. Log in to your Client Area.
  2. Navigate to Domain Management and select your domain.
  3. Find the Mailbox or Custom Domain Email section.
  4. Use the provided option to set a new password for your mailbox.
  5. Save your changes – your new password will be effective immediately.

Password Requirements and Tips for Security

To keep your mailbox secure, your password must:

  • Be at least 8 characters long (maximum 16 characters).
  • Include at least one uppercase letter, one lowercase letter, and one number.
  • Not contain spaces or special invisible characters.
  • Avoid common or easily guessed passwords (e.g., “password123”).

Security Tips:

  • Use a unique password that you don’t use elsewhere.
  • Avoid using personal information like birthdays or names.
  • Change your password regularly to maintain security.

5. Mailbox Storage and Limits

Mailbox Sizes by Product Type

Each mailbox plan offers a different amount of storage to suit your needs:

  • Basic Mailbox: 1GB of storage – ideal for light email use.
  • Standard Mailbox: 5GB of storage with added spam protection – perfect for most small businesses.
  • Pro Mailbox: 10GB of storage with priority support – great for heavy email users and professionals.

What Happens If Your Mailbox Fills Up?

If your mailbox reaches its storage limit:

  • You may stop receiving new emails until you free up space by deleting old messages.
  • Some incoming emails might bounce back to the sender with a notification that your mailbox is full.
  • You will not be able to send emails until you free up space or upgrade your plan.

How to Upgrade Storage

If you find your mailbox storage isn’t enough:

  1. Log in to your Client Area.
  2. Navigate to your domain’s mailbox product.
  3. Choose an upgrade option to a higher storage plan.
  4. Complete the upgrade process – your storage will increase immediately or within a few minutes.
  5. Contact support if you need assistance with upgrading.

6. Spam Protection and Security

Spam Filtering with SpamAssassin

To help keep your mailbox clean and free from unwanted junk emails, we use SpamAssassin, a powerful spam filtering system running on our mail servers.

  • Incoming emails are automatically scanned and scored for spam-like characteristics.
  • Emails identified as spam are marked or moved to a spam/junk folder, helping you focus on important messages.

Malware Scanning with Maldet

In addition to spam filtering, we employ Maldet (Malware Detect) to scan all email attachments for malware and viruses.

  • Suspicious or harmful attachments are flagged or blocked to protect your device and data.

How to Report Spam or Phishing Emails

If you receive a suspicious email that bypasses the filters:

  • Do not open attachments or click links in the email.
  • Forward the email to our support team at abuse@uk-cheapest.co.uk with the subject “Spam/Phishing Report.”
  • Delete the email from your mailbox after reporting.

7. Configuring Email Forwarding

How to Forward Emails from Your Domain Email Address

If you have a parked domain using our default nameservers, you can easily forward emails sent to your domain’s aliases to any external mailbox of your choice. This is perfect if you want emails addressed to info@yourdomain.co.uk or sales@yourdomain.co.uk to be redirected to your main mailbox or another email account.

To set up email forwarding:

  1. Log in to your Client Area.
  2. Navigate to the domain management section for your parked domain.
  3. Locate the Email Forwarding section.
  4. Add or edit forwarding aliases by specifying the prefix (alias) and the destination email address.
  5. Save your changes – forwarding is typically active within minutes.

Limitations and Best Practices

  • There are no limits on the number of forwarding aliases you can create. Feel free to set up as many as you need.
  • Choose aliases carefully to minimise spam. Generic aliases like info or admin tend to attract more unsolicited mail.
  • Regularly review and update your forwarding rules to keep them relevant.
  • Forwarded emails depend on the external mailbox’s availability and configuration; ensure your destination mailbox is functioning correctly.

Homepage Builder: Instantly Create Your Online Presence


What is the Homepage Builder?

The Homepage Builder is a powerful, easy-to-use tool included FREE with every domain registered at UK Cheapest. It lets you build a simple, professional, multi section website – no coding, no hassle.

Just pick a layout, add your content, and go live in minutes. Perfect for individuals, small businesses, and anyone who needs a quick and effective web presence.

Why Use the Homepage Builder?

  • Instant Launch: Get your domain online immediately, even if you don’t have a full website ready.
  • Easy Editing: Use our intuitive visual editor—simply type your text, add images, and publish.
  • Professional Templates: Choose from a selection of attractive, mobile-friendly layouts for every style and industry.
  • No Coding Required: Focus on your content, not on technical details.
  • Perfect for Any Purpose: Use as a digital business card, portfolio, event page, landing page, or personal homepage.

What Can You Build?

  • Business landing page: Announce your services, display your contact details, and start collecting enquiries.
  • Personal website: Share your story, resume, or creative work in a polished online format.
  • Coming soon page: Get online quickly while you prepare a larger site.
  • Simple multi-section sites: Create up to three sections – great for showcasing services, testimonials, and a contact form.

How to Build Your Homepage (Step-by-Step)

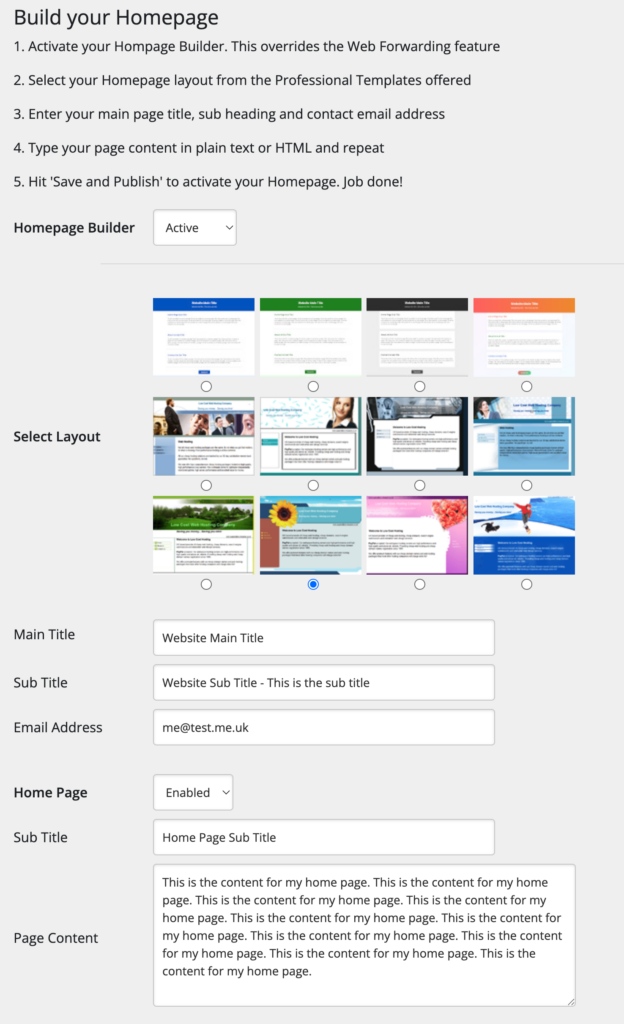
  1. Activate the Homepage Builder:Turn it on in your UK Cheapest control panel. Note: Activating the builder will override any existing web forwarding settings for your domain.
  2. Choose Your Layout:Select from our library of professional, mobile-responsive templates. Pick one that fits your style or business.
  3. Enter Your Website Details:Fill in your main title, subtitle, and contact email.
  4. Add Your Content:Use plain text or HTML for your home page content and any additional pages. You control the headlines, descriptions, and sections.
  5. Publish:Click Save and Publish—your site is now live for the world to see!

Pick your template, fill in your details, and get online in seconds!

Frequently Asked Questions

Q: How many sections can I create?

A: The Homepage Builder allows up to three sections – ideal for a home, about, and contact page.

Q: Do I need technical skills?

A: Not at all! The builder is designed for everyone – no coding or design knowledge required.

Q: Can I update my site later?

A: Yes! You can edit your titles, content, and layout at any time – changes go live instantly.

Q: What happens to my web forwarding?

A: When the Homepage Builder is active, it replaces web forwarding for your domain. You can switch back anytime.

Q: Is this really free?

A: Yes – Homepage Builder is completely free with every UK Cheapest domain.

Get Started Today

Build your homepage and claim your spot on the web—no stress, no hidden costs.

For advanced sites, eCommerce, or more design options, check out our Website Builder Plans.

How to Install WordPress on Plesk Obsidian: A Beginner’s Guide

Installing WordPress on your UK Cheapest Plesk Obsidian server is incredibly easy, even if you’re new to web hosting. With Plesk’s user-friendly interface, you can set up WordPress in just a few clicks. Follow this guide to get your WordPress site up and running!

Step 1: Log In to Your Plesk Control Panel

Start by logging into your Plesk Obsidian control panel. You’ll find the login details in the welcome email from UK Cheapest, or you can log in at:

URL: https://your-domain.com:8443

Enter your username and password to access the dashboard.

Step 2: Go to the WordPress Toolkit

Once inside the Plesk dashboard, find the WordPress Toolkit on the left-hand menu. The WordPress Toolkit makes it simple to install, manage, and update your WordPress sites.

If you don’t see the WordPress Toolkit, navigate to Extensions in the menu and install the WordPress Toolkit extension for free.

Step 3: Install WordPress

With the WordPress Toolkit open, follow these steps to install WordPress:

  1. Click on Install WordPress in the top right corner.
  2. Select your domain or subdomain from the dropdown where you want to install WordPress.
  3. Choose installation path (leave blank if you want WordPress to be installed in the root directory of your domain).
  4. Under Installation Settings, enter your site title, admin username, password, and email. These will be used to log in to your WordPress dashboard.
  5. For security, make sure Enable HTTPS is checked if you have an SSL certificate installed. This will ensure that your site uses HTTPS.
  6. Click Install.

The installation process will begin, and within a few moments, your WordPress site will be ready!

Step 4: Access Your WordPress Admin Dashboard

Once WordPress is installed, you can access your WordPress admin dashboard:

  • In the Plesk dashboard, navigate to the WordPress Toolkit.
  • Under the list of installed WordPress sites, find your domain.
  • Click on the Log in to Admin Dashboard button. This will take you directly to the WordPress admin panel.

You can also access your dashboard by going to https://your-domain.com/wp-admin and entering your WordPress admin username and password.

Step 5: Customise Your WordPress Site

Now that you’re inside the WordPress dashboard, you can start customising your site:

  • Choose a theme by going to Appearance > Themes.
  • Install plugins by navigating to Plugins > Add New.
  • Create pages and posts from the Pages and Posts sections.

WordPress gives you complete control over your site, and with Plesk’s toolkit, managing updates, plugins, and security is easy.

Step 6: Enable Automatic Updates (Optional)

To keep your site secure and up to date, you can enable automatic updates for WordPress core, themes, and plugins:

  1. In the Plesk WordPress Toolkit, find your site and click Manage.
  2. Under Updates, enable automatic updates for WordPress core, plugins, and themes if desired.

If you haven’t already enabled SSL during the WordPress installation, you can do so now to secure your site with HTTPS:

  1. Go to Websites & Domains in the Plesk dashboard.
  2. Click on SSL/TLS Certificates under your domain.
  3. Select Let’s Encrypt to issue a free SSL certificate for your site.
  4. Once installed, Plesk will automatically configure your site to use HTTPS.

Congratulations! Your WordPress Site is Ready

That’s it! You’ve successfully installed WordPress on Plesk Obsidian. From here, you can start customising your site, installing plugins, and adding content. Thanks to Plesk’s easy-to-use interface, managing your WordPress site will be smooth and efficient.

Need further help? Don’t hesitate to reach out to our support team for assistance!

Beginners Guide: Why Buy a Domain Name from UK Cheapest?

In the digital world, your domain name is your unique identity, a virtual address for your online space, be it for business or personal use. For beginners stepping into this realm, choosing where to buy your domain name is a crucial decision. UK Cheapest stands out as an excellent choice for several reasons, especially for those who are new or non-technical. Let’s explore why buying a domain name from UK Cheapest is a smart move.

1. Affordability Without Compromise

One of the most compelling reasons to choose UK Cheapest is, as the name suggests, its competitive pricing. Starting an online venture or setting up a digital space shouldn’t break the bank. UK Cheapest offers affordable domain name registration, ensuring you can secure your online identity without a hefty price tag. But don’t mistake low prices for low quality. Despite being budget-friendly, UK Cheapest does not compromise on the quality and reliability of its services.

2. User-Friendly Process

For those who are new to domain names, the process of choosing and buying a domain can seem daunting. UK Cheapest makes this process straightforward and user-friendly. Their website is easy to navigate, making it simple to search for and register your chosen domain name. Plus, if you have any questions or need guidance, their customer support team is known for being helpful and responsive.

3. Range of Domain Options

Whether you’re looking for a classic .com or a .co.uk domain, or something more niche like .photography or .guru, UK Cheapest offers a wide range of domain options. This variety ensures you can find a domain that perfectly matches your business, blog, or personal brand’s essence.

4. Additional Services

Beyond just domain registration, UK Cheapest provides a suite of additional services that are beneficial for setting up and managing your online presence. This includes web hosting, SSL certificates for website security, and email services. Having these services available from the same provider that manages your domain adds convenience and simplifies the management of your online assets.

5. Transparency and No Hidden Fees

Transparency is key in any transaction, and UK Cheapest is upfront about their pricing and policies. There are no hidden fees or unexpected charges. What you see is what you get, which is particularly reassuring for beginners who might be wary of unexpected costs.

6. Reliable and Secure

Security and reliability are non-negotiable when it comes to your online presence. UK Cheapest ensures that your domain is not only registered but also protected. With features like DNS management and the option to add privacy protection, you can have peace of mind knowing your domain is secure.

7. UK-Based with Local Support

Being a UK-based company, UK Cheapest offers the advantage of local, UK-focused customer support. This can be particularly beneficial for UK-based businesses or individuals who prefer support in their time zone and context.

Conclusion

Choosing where to buy your domain name is a foundational decision in your online journey. UK Cheapest offers an ideal combination of affordability, ease of use, variety, transparency, and reliable support, making it a great choice, especially for beginners. It’s about more than just buying a domain name; it’s about starting your online journey on the right foot, with a provider that supports and understands your needs. Whether for a business, a personal blog, or any other online venture, UK Cheapest stands out as a wise choice for those stepping into the digital space.

Beginners Guide: What is an SSL Certificate?

Security is a paramount concern, especially when it comes to navigating the web. Whether you’re setting up an online shop, running a blog, or even just browsing, you’ve likely come across the term “SSL Certificate.” This guide aims to explain what an SSL Certificate is, highlighting how services like UK Cheapest can help you secure your website.

SSL Certificate: The Basics

SSL stands for Secure Sockets Layer. Think of an SSL Certificate as a digital passport for a website. It provides a secure connection between a web server (where your website is hosted) and a web browser (like Chrome, Safari, or Firefox). When a website has an SSL Certificate, it means any information you input into that site is encrypted, or in simpler terms, turned into a secret code that only the website can understand.

Why is an SSL Certificate Important?

  1. Security: It protects sensitive data transmitted from and to your website. This includes personal information like names, addresses, passwords, or credit card numbers.
  2. Trust: Websites with SSL Certificates show a padlock icon in the browser’s address bar. This padlock is a sign of trust, indicating that the website is secure and cares about visitors’ privacy.
  3. SEO Benefits: Search engines like Google give preference to SSL-secured websites. This means having an SSL Certificate can help your website rank higher in search results.
  4. Compliance: For certain types of websites, particularly those handling credit card transactions, having an SSL Certificate is a requirement to comply with privacy and security standards.

How Does an SSL Certificate Work?

An SSL Certificate works by establishing an encrypted connection. When you visit a secured website, the SSL Certificate creates a secure link where data can pass safely. It’s like sending a letter in a locked safe; only the sender and the recipient have the key to open it.

Types of SSL Certificates

There are different types of SSL Certificates, each serving different needs:

  1. Domain Validated (DV): This is the most basic level of SSL and is often used for blogs or informational websites. Verification is simple, with the Certificate Authority (CA) only needing to confirm the applicant owns the domain.
  2. Organisation Validated (OV) and Extended Validation (EV): These are used by organisations and businesses. They require more thorough verification, providing a higher level of security and trust.

Getting an SSL Certificate with UK Cheapest

For those new to SSL Certificates, UK Cheapest offers an easy and affordable way to secure your website. They provide various types of SSL Certificates, catering to different needs and budgets. The process of obtaining and installing an SSL Certificate with UK Cheapest is straightforward, making it accessible even for non-technical users.

Conclusion

In summary, an SSL Certificate is a critical component of website security and trustworthiness. It’s not just a technical requirement; it’s a commitment to protecting your visitors and enhancing your website’s credibility. Services like UK Cheapest make obtaining and using SSL Certificates simple and affordable, ensuring that even beginners can secure their websites effectively. Whether you’re starting a personal blog or setting up an online store, having an SSL Certificate is a smart and essential step in building a safe and trusted online presence.