DNS Manager: Take Control of Your Domain’s Destiny


Easily Manage Your Domain DNS – No Tech Skills Needed

Your domain’s DNS controls where your website, email, and every online service is pointed. With our DNS Manager, you get full control in a user-friendly dashboard—free with every domain. Whether you need to connect to a website builder, update email servers, or verify your site with Google, it’s all a few clicks away.

  • Update All DNS Records: Manage A, CNAME, TXT, SPF, and MX records for full flexibility.
  • Easy-to-Use Interface: Add, edit, or remove records instantly—no complicated menus.
  • Instant Propagation: Most updates take effect in minutes, with a clear “zone valid” indicator.
  • Free With Every Domain: No hidden fees or upcharges for DNS control.
  • Connect Anywhere: Use your domain with Google, Wix, Shopify, Squarespace, Microsoft 365, and more.
  • Reset in One Click: If you ever get stuck, restore default settings in seconds.

How It Works

  1. Log in to your UKC account and select your domain.
  2. Open DNS Manager from your control panel.
  3. View and Edit Records:
    • A Record: Points your domain to a website (IP address)
    • CNAME: For subdomains (like www) pointing elsewhere
    • MX Records: Route email to your mail provider
    • TXT/SPF: Used for verification, security, or third-party services
  4. Make Changes Instantly:Add new records or update existing ones. Changes are saved with the blue “Apply” button.
  5. See Status At A Glance:If your DNS is set up correctly, you’ll see a green “This zone file is valid” message.
  6. Easy Recovery:If something goes wrong, use “Reset to Original Defaults” to restore standard settings.


Interface Preview
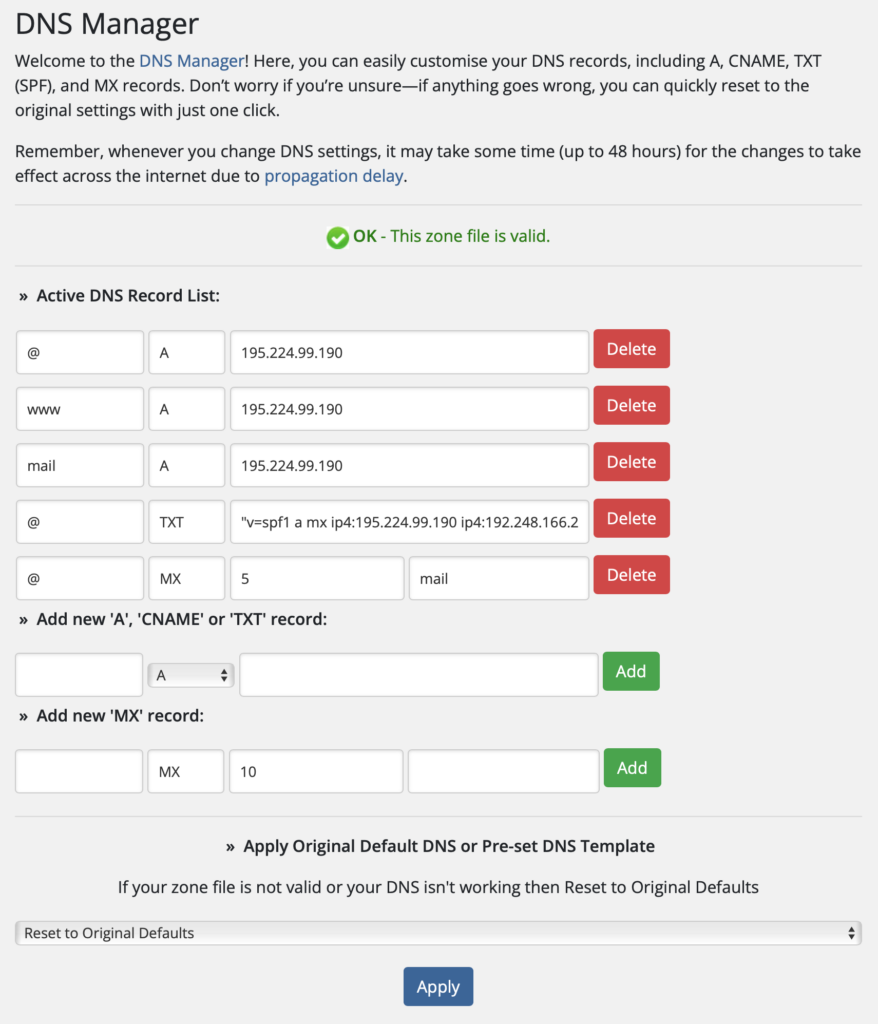
Our DNS Manager puts you in control: add, edit, or remove DNS records in seconds. Everything is labelled clearly, with instant feedback on your changes.

Frequently Asked Questions

How long do DNS changes take to go live?

Most DNS changes are instant, but some may take up to 48 hours to propagate globally.

Can I break my website by changing DNS?

Only if you point your domain to the wrong place. If unsure, you can always reset to default settings.

Is the DNS Manager really free?

Yes! Full DNS control is included with every domain registration at UK Cheapest.

Can I use my domain with third-party services?

Absolutely! Our DNS Manager is compatible with all major website builders, email hosts, and verification services.


Get Started Today

Ready to take control of your domain?

Log in to your UKC account and try out our DNS Manager now. Need help? Contact our UK-based support team – we’re here 24/7.

Tip:

If you’re moving to Google, Wix, Squarespace, Microsoft 365, or any service, check their help page for DNS records—they’ll give you the exact details to enter here!


Still have questions?

Reach out to us – our friendly support team is always happy to help you get your domain working perfectly.

How to Connect Your UK Cheapest Domain Name with Squarespace

If you’ve registered a cheap domain name with UK Cheapest, you’re not limited to using it only with UKC hosting services. One of the great benefits of registering with us is that your domain can be easily connected to third-party platforms including popular website builders like Squarespace.

Why Use a UKC Domain with Squarespace?

Many UK-based individuals and small businesses choose UK Cheapest for domain registration because we offer:

  • Low-cost domain names – register a .UK domain for just £1
  • Free extras – DNS Manager, Web Forwarding, Email Forwarding, Privacy Protection, and Homepage Builder
  • Full control – connect your domain to any third-party platform like Squarespace, Wix, or WordPress.com

Step-by-Step: Connecting Your UKC Domain to Squarespace

1. Log in to your Squarespace account

Visit Squarespace.com and sign in. From the Home menu, go to Settings > Domains. Click Use a domain I own.

2. Enter your UK Cheapest domain name

Type your domain (e.g., yourdomain.co.uk) and click Continue. When asked who your domain provider is, select Other. Then choose Connect domain (not transfer).

3. Get your Squarespace DNS settings

Squarespace will show a list of DNS records—usually including a CNAME for “www” and several A records. Leave this page open, as you’ll need to copy the values into your UKC account.

4. Log in to your UK Cheapest account

  1. Go to uk-cheapest.co.uk and log in to your Client Area.
  2. Click on Domain Names > My Domains and select the domain to connect.
  3. Click Manage Domain and go to DNS Management or Free DNS Manager.

5. Update your DNS records

Remove any existing A or CNAME records, then add the DNS records provided by Squarespace.

Example:

  • A Record: @198.185.159.144
  • CNAME: wwwext-cust.squarespace.com

Be sure to enter each records exactly as shown in Squarespace.

6. Save your changes and wait

Once saved, DNS updates can take several hours (up to 24) to propagate. During this time, your domain will start pointing to your Squarespace site.

Need Help?

If you’d like help updating your domain settings, our UK-based support team is here to assist. We can walk you through the process or make the updates for you.

Final Thoughts

Registering a domain with UK Cheapest gives you flexibility, affordability, and complete control. Your domain can be used with Squarespace and many other website builders—quickly and easily.

Ready to start? Register your domain and build your online presence today.


How to Switch from Email 2FA to Time-Based (App) 2FA

How to Switch from Email 2FA to Time-Based (App) 2FA

At UK Cheapest, we recommend using Time-Based Two-Factor Authentication (2FA) for improved security and reliability. While email-based 2FA works well for many users, time-based 2FA (using an app like Google Authenticator or Authy) is generally faster and does not rely on email delivery.

This guide explains how to switch your account from Email 2FA to Time-Based Token 2FA in your Client Area.


Step 1: Log In to Your Client Area

Visit the Client Area at:
https://billing.uk-cheapest.co.uk/clientarea.php
Log in using your usual account credentials.


Step 2: Open Your Security Settings

  • Click on your profile name or icon in the top-right corner of the screen
  • Select “Security Settings” from the dropdown menu

This page displays your current 2FA setup.


Step 3: Disable Email-Based 2FA

If you currently use email-based 2FA:

  1. Click “Disable Two-Factor Authentication”
  2. You may be prompted to enter a code sent to your registered email address
  3. Once confirmed, 2FA will be disabled for your account

Step 4: Enable Time-Based 2FA

Once 2FA is disabled, you can immediately set up a new method:

  1. Click “Enable Two-Factor Authentication”
  2. Choose the option for Time-Based Tokens
  3. Click “Continue”

Step 5: Scan the QR Code Using Your 2FA App

  1. Open your 2FA app of choice (such as Google Authenticator, Authy, or Microsoft Authenticator)
  2. Tap the option to add a new account
  3. Use your device’s camera to scan the QR code displayed on the screen
  4. Your app will now generate a 6-digit security code that changes every 30 seconds

Step 6: Confirm and Activate

  1. Enter the current 6-digit code from your 2FA app into the field in your Client Area
  2. Click “Activate” or “Confirm”

Your account is now protected with time-based 2FA.


Need to Switch Devices or Reset 2FA?

If you lose access to your 2FA app or change devices, you may need to disable and re-enable 2FA. If you’re unable to log in, contact our support team and we can help reset your 2FA settings.


Still Prefer Email-Based 2FA?

You can re-enable email authentication at any time by repeating the steps above and selecting Email instead of Time-Based Tokens during the setup process.


Get Support

If you have any questions or experience any issues during setup, please submit a support ticket and our team will be happy to help.

Setting up 2FA for the First Time

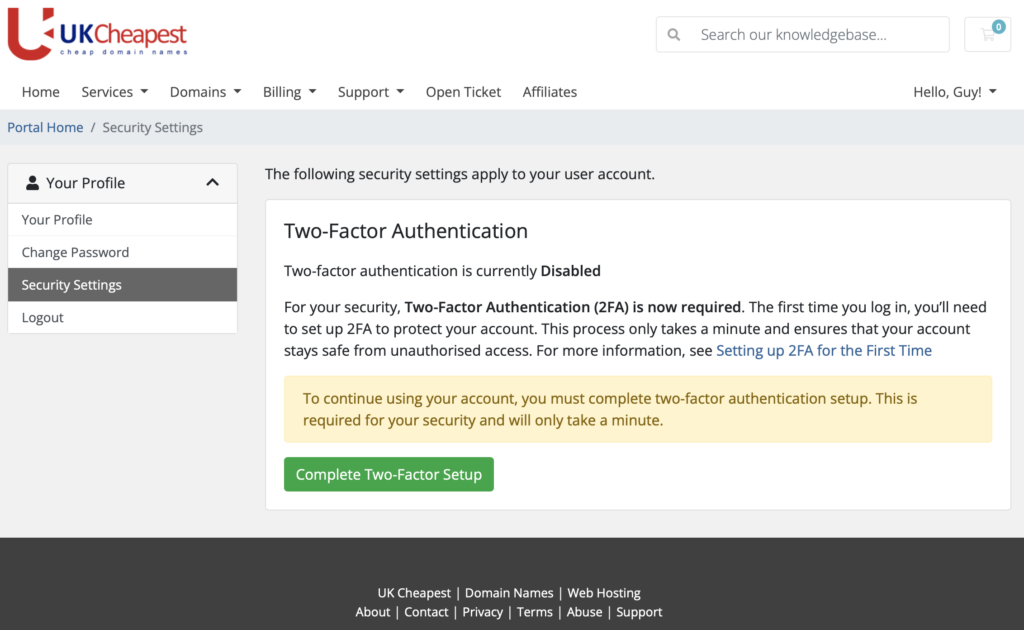
For your security, Two-Factor Authentication (2FA) is now required. The first time you log in, you’ll need to set up 2FA to protect your account. This process only takes a minute and ensures that your account stays safe from unauthorised access.

Follow the steps below to complete your 2FA setup quickly and easily. Once done, you’ll enjoy a more secure and protected login experience every time.


Step 1: Login to your account, you will be taken to the Security page


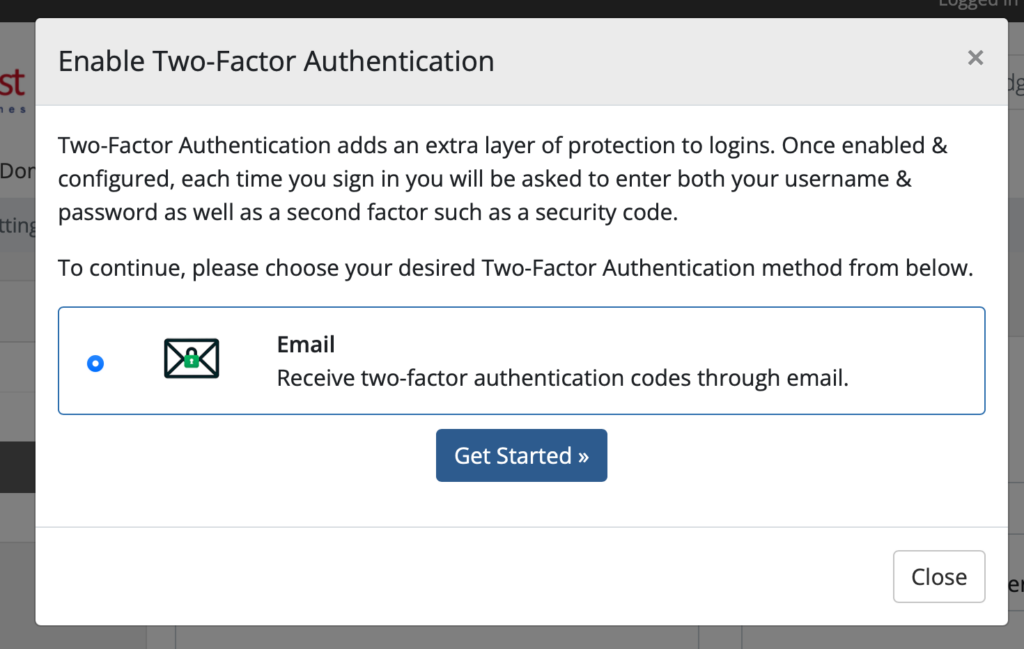
Step 2: Click “Complete Two-Factor Setup” then click “Get Started”


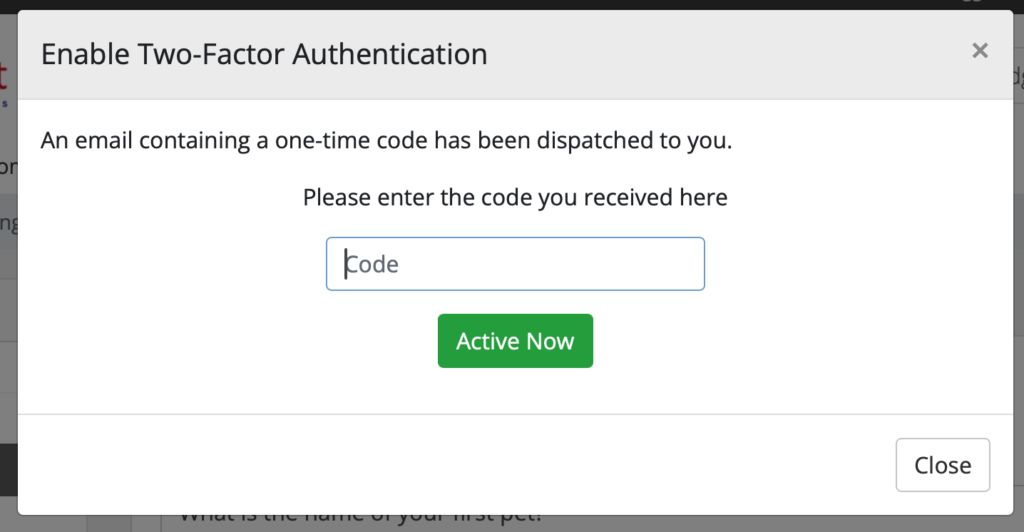
Step 3: Check your email for the code and enter it here, press “Active Now”


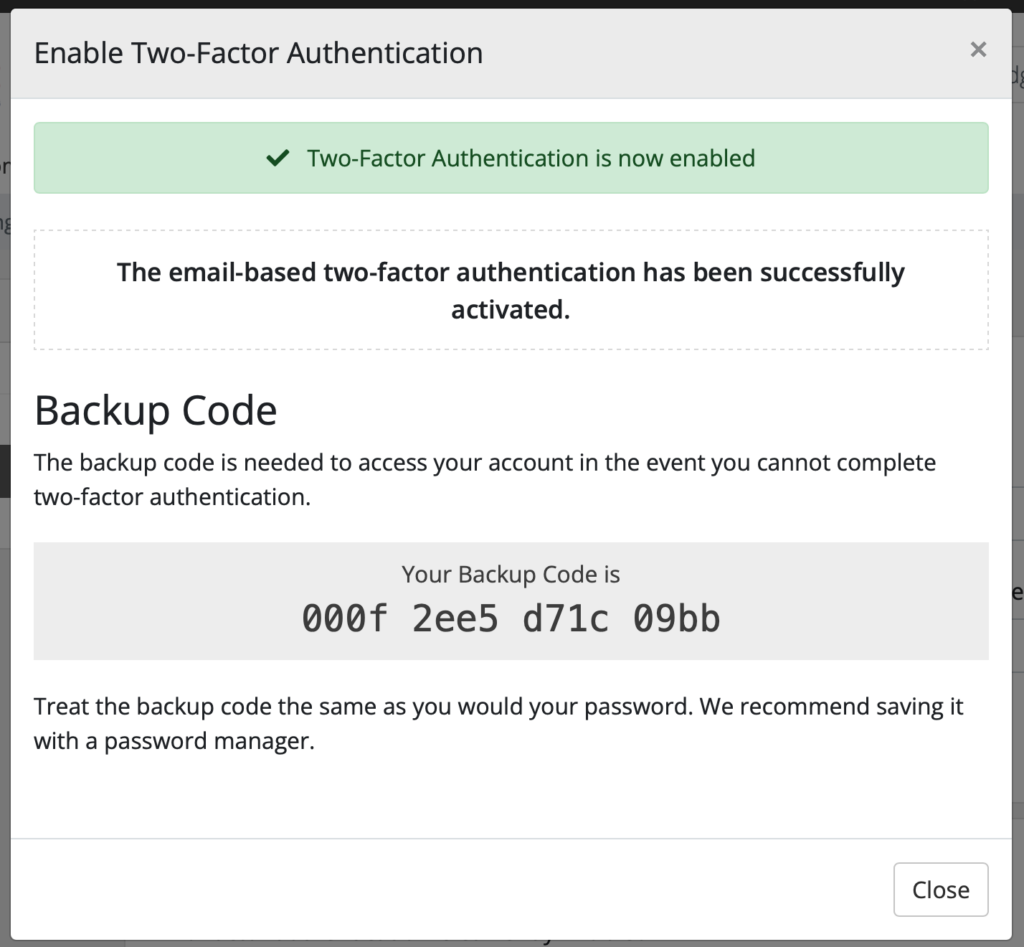
Step 4: Your setup is now complete. Save your backup code.


Step 5: You can now use the Client Area and all features are enabled.


Congratulations! Your Account is Now More Secure!

By setting up Email Two-Factor Authentication (2FA), you have added an extra layer of security to your account. This means that even if someone ever gets hold of your password, they will not be able to access your account without the unique 2FA code sent to your email.

What This Means for You:

  • Your account is now much harder to hack.
  • You have better protection against phishing and unauthorised access.
  • Every login attempt now requires both your password and a unique security code, making it twice as secure.

What’s Next?

  • Always keep your email secure and never share your 2FA codes with anyone.
  • If you ever change your email address, update it with us to avoid login issues.
  • Want even stronger security? You can also explore Google Authenticator 2FA for even faster logins in the future.

If you have any questions or ever need help, our support team is always here for you.

Enjoy your safer and more secure account!

A Simple Guide to Two-Factor Authentication (2FA) for Your Account

What is 2FA?

Two-Factor Authentication (2FA) adds an extra layer of security to your account. Instead of just a password, you also need a one-time security code to log in.

Why Do I Need 2FA?

Passwords alone can be stolen or guessed. 2FA makes it much harder for hackers to access your account, even if they know your password.


How to Set Up Email 2FA (First-Time Login)

Since this is your first time logging in, you will be asked to set up Email 2FA.

  1. Log in to your account using your email and password.
  2. You will be redirected to the Security Settings page.
  3. Click Enable Two-Factor Authentication.
  4. A 6-digit code will be sent to your registered email.
  5. Enter the code to confirm your 2FA setup.
  6. Done! Your account is now protected.

How to Use Email 2FA (Ongoing Logins)

Every time you log in, you will:

  1. Enter your email and password as usual.
  2. Check your email for a 6-digit 2FA code.
  3. Enter the code on the login page.
  4. Access granted!

⚠️ Tip: If you don’t see the email, check your Spam/Junk folder.


Need Help?

❓ Q1: “I Didn’t Receive the 2FA Code in My Email. What Should I Do?”

A: If your 2FA email hasn’t arrived, try these steps:

  • ✅ Check your Spam/Junk folder.
  • ✅ Wait a few minutes, then request a new code.
  • ✅ Ensure your email account is working properly and not full.
  • ✅ If you still don’t receive it, contact support to verify your email address.

❓ Q2: “My Google Authenticator App is Not Working. How Can I Fix It?”

A: If your Google Authenticator codes are incorrect or not appearing, try:

  • Sync your phone’s time (Settings → Date & Time → Enable “Automatic Time”).
  • ✅ If the app was deleted, reinstall it and restore from your backup code.
  • ✅ If you lost access completely, contact support to reset your 2FA settings.

❓ Q3: “I Lost My Phone and Can’t Access My 2FA. What Now?”

A: If your phone is lost or broken:

  • ✅ Use your backup codes (provided when setting up 2FA).
  • ✅ If Email 2FA is enabled, request a new login code via email.
  • ✅ If you have no access at all, contact support for verification and reset.

❓ Q4: “Why is My 2FA Code Incorrect?”

A: If your 2FA code isn’t working:

  • ✅ Enter a new code quickly before it expires.
  • Sync your phone’s time and date settings.
  • ✅ Double-check that you are using the correct 2FA method (Google Authenticator vs. Email 2FA).
  • ✅ If the issue continues, reset 2FA and set it up again.

❓ Q5: “I Enabled 2FA but Now I Can’t Log In at All!”

A: If you’re completely locked out:

  • ✅ Use the password reset option to regain access.
  • ✅ If you set up Email 2FA, request a new code via email.
  • ✅ If all else fails, contact support to reset your 2FA after verifying your identity.

🔒 Final Tip: Always Keep a Backup!

To avoid future issues:

  • ✅ Save your backup codes when setting up 2FA.
  • ✅ Use a password manager to securely store credentials.
  • ✅ Enable Email 2FA as a fallback in case you lose access to Google Authenticator.

🚀 2FA adds an extra layer of security, and with these solutions, you’ll always have access to your account! 🔐😊

Still Need Help?

If you have any issues logging in, contact our support team.

🔒 Stay secure – 2FA keeps your account safe! 🚀