How to: Setup Email using Apple Mail

The instructions provided in this section were verified against Apple Mail 8.2. They might not work with earlier or later versions of Apple Mail.

To set up Apple Mail:

  1. Open Apple Mail and choose the Add Other Mail Account option from the list.

  2. Click Continue.

  3. Specify your full name, your email address and password, and click Create. After you are prompted to configure the account manually, click Next.

  4. Specify the following:
    • Account type. Select IMAP if you want to keep copies of received email messages on the server. Select POP if you do not.
    • Mail Server. Type in your domain name, for example, example.com.
    • User Name. Type in your full email address.
    • Password. Type in your password.
    • Click Next.
  5. Specify the following:
    • Path Prefix: Enter INBOX as the path prefix.
    • Port. Use port 143 if you selected IMAP or 110 if you selected POP. If you leave it set to AUTO sometimes the wrong port is used.
    • Option Use SSL: Please leave the option as unchecked.
    • Authentication. Select Password from the menu.
  6. Click Next.

  7. Specify the following:
    • SMTP Server. Type in your domain name, for example, example.com.
    • User Name. Type in your full email address.
    • Password. Type in your password.
  8. Click Next. When prompted for additional information, click Next again.

  9. Specify the following:
    • Port.Use port 587. If you leave it set to AUTO sometimes the wrong port is used.
    • Use SSL. Please leave the option Use SSL as unchecked.
    • Authentication. Select Password from the menu.
  10. Click Create.

Troubleshooting Apple Mail SMTP – Cannot Send Emails

If you are having problems with Apple Mail SMTP using IMAP, ensure you are using the following settings: Mail > Preferences > SMTP > Edit SMTP Server List > Advanced

  • Automatically detect and maintain account settings: No
  • Port: 587
  • Use SSL: No
  • Authentication: MD5 Challenge-Response
  • Allow insecure authentication: Yes

How to: Login to RoundCube

RoundCube is our preferred webmail client. It is fast, lightweight and very easy to use. RoundCube is well known for its Ajax driven user interface.

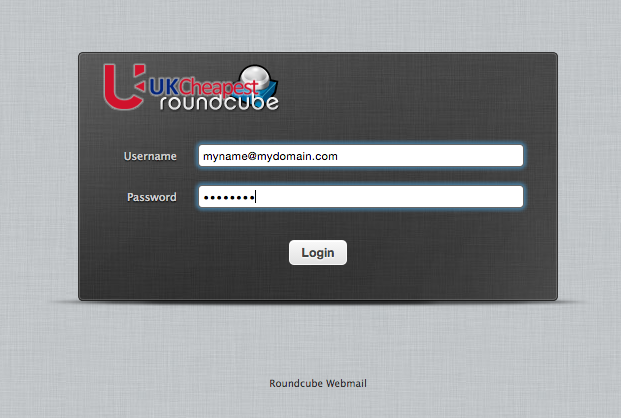
Logging into RoundCube is very easy. Unlike AtMail, RoundCube requires your email address – all of it – as your username. If you are used to AtMail then you may be accustomed to typing only the prefix.

By using the full email address, your login screen should look something like this:

Screen Shot 2015-05-06 at 06.29.33

All of our Plesk 12 hosting services now use RoundCube as default. AtMail is no longer offered as an option due to performance issues. Unfortunately the AtMail address book is not compatible with RoundCube, you will have to recreate your entries.

Beyond the Basics

View the RoundCube User Guide to gain the most from this brilliant webmail application.

Plesk 12 Step-by-step Video Tutorials

Using Plesk is easy. Quickly learn how to accomplish the most common tasks with our Plesk tutorial videos. You can also find these tutorials within the Plesk panel itself.


Changing Passwords
How to: Change the Plesk 12 Panel Password


Updating Contacts
How to: Update your Contact Information


File Management
How to: Use the Plesk File Manager


Using FTP
How to: Add, edit and remove FTP accounts


Building Web Sites
How to: Use the Web Presence Builder


Managing Domains
How to: Add websites to your hosting account


Managing Subdomains
How to: Add subdomains to your hosting account


Domain Forwarding
How to: Setup domain name forwarding


Mailboxes
How to: Create and manage mailboxes


Mail Forwarding
How to: Create mail forwarding addresses


Auto Responders
How to: Create auto responders and replies


Installing WordPress
How to: Install a WordPress application


Mail Aliases
How to: Create email aliases and forwarding


Mailing Lists
How to: Create and Manage Mailing Lists


Managing Subscriptions
How to: Change Subscription Passwords

The Official Plesk 12 Customer Guide has everything you need to become proficient using Plesk.

MICROLITE4 Plesk 12 Upgrade

Plesk-12-Banner

MICROLITE4.COM – Upgrades

As part of our service to you, we strive to provide you with the very latest services, performance and security for your web sites. Our new upgrade schedule will completely replace your hardware and software to the very best available.

“During the period 5th thru 8th May the server hardware and plesk panel will be completely upgraded.”

HARDWARE: The new hardware will improve the performance and reliability of the server. Response times and security will be greatly increased. The server will also be migrated to our new UK datacenter. The old IP address was 5.77.42.5. The new IP address will be 5.77.60.156.

SOFTWARE: The core OS of the new server will be of the latest stable version. PHP, MySQL  and all other features will be of the latest production versions.

PANEL: The Plesk Panel will be upgrade to Plesk 12, the current latest version of Plesk. This will provide the very latest features, functionality and security for your accounts.

ENHANCED SECURITY: The new Security Core combines ModSecurity, CSF, Malware Detect and Fail2Ban with Outbound Antispam and ServerShield™ tools and many features that protect against malicious attacks and site vulnerabilities.

WEBMAIL: AtMail is now replaced with the awesome RoundCube. Your username is in the format name@yourdomain.co.uk. Your passwords are unchanged. If you do have a problem with your mail password simply change it or request support to change it for you.

COST: These are no-cost upgrades, there will be no additional charges to your account.

DOCUMENTATION: Take a look at our Step-by-step Video Tutorials or review the Official User Guide

Notice: Please refrain from making significant changes to your web site during this period. The migration of the data will take many hours. We request that you put off any changes until the upgrade is complete to avoid an inconsistent transfer of your site data.

MICROLITE3 Plesk 12 Upgrade

Plesk-12-Banner

MICROLITE3.COM – Upgrades

As part of our service to you, we strive to provide you with the very latest services, performance and security for your web sites. Our new upgrade schedule will completely replace your hardware and software to the very best available.

“During the period 1st thru 6th May the server hardware and plesk panel will be completely upgraded.”

HARDWARE: The new hardware will improve the performance and reliability of the server. Response times and security will be greatly increased. The server will also be migrated to our new UK datacenter. The old IP address was 109.75.161.213. The new IP address will be 5.77.60.44.

SOFTWARE: The core OS of the new server will be of the latest stable version. PHP, MySQL  and all other features will be of the latest production versions.

PANEL: The Plesk Panel will be upgrade to Plesk 12, the current latest version of Plesk. This will provide the very latest features, functionality and security for your accounts.

ENHANCED SECURITY: The new Security Core combines ModSecurity, CSF, Malware Detect and Fail2Ban with Outbound Antispam and ServerShield™ tools and many features that protect against malicious attacks and site vulnerabilities.

WEBMAIL: AtMail is now replaced with the awesome RoundCube. Your username is in the format name@yourdomain.co.uk. Your passwords are unchanged. If you do have a problem with your mail password simply change it or request support to change it for you.

COST: These are no-cost upgrades, there will be no additional charges to your account.

DOCUMENTATION: Take a look at our Step-by-step Video Tutorials or review the Official User Guide

Notice: Please refrain from making significant changes to your web site during this period. The migration of the data will take many hours. We request that you put off any changes until the upgrade is complete to avoid an inconsistent transfer of your site data.