How to: Transfer your Web Site to UKC

transfer-iconTransferring your Web Site to UKC without Downtime

Moving your site from an old host to a new host might sound complicated but it is actually very easy.

Our technicians are moving all types of sites (self built, WordPress, Joomla, shopping carts) on a daily basis. Leave the complexity to us.

We will help you transfer your web site, data and mysql databases to our hosting service and minimise (if not eliminate) the need for any downtime whatsoever.

Here are the steps to follow:

  1. Order your new hosting plan from UKC. Do not cancel your old hosting plan (yet).
  2. Is your old host using Plesk? If so, all you need do is run a full backup in Plesk Backup Manager and provide us with the backup file. We can restore from here.
  3. You will now have access to two hosting accounts.

What we need from you

In order for us to successfully transfer your website, we need the following:

  1. A backup of your hosting account run from your old host (if you have one)
  2. The panel login details of your old hosting plan
  3. The FTP details of your old hosting plan
  4. If you have SSH with the old host, then these details can also help

From here we can take care of the transfer of all of your site data and databases.

Going live without downtime

We will transfer all of your web site, data and mysql databases before the “going live” date which we will agree with you beforehand.

Once we go live, the switch will simply be a name server change on your domain name. At this point, your web site will now be live using a UKC hosting plan. Once you are happy with the operations of your new site you can then proceed to cancel your old hosting plan.

If you have any questions now (or along the way) simply contact the Helpdesk who are there to help.

How to Create Password Protected Directories

header_ppp_circle_270x274Protecting Files and Folders in Plesk

If you have directories in a site that only authorised users should see, restrict access to these directories with password protection.

To protect a directory in your site with a password and to specify authorised users:

  1. If you are subscribed to several hosting packages and have access to several webspaces associated with your account, select the required webspace in the Subscription menu at the top of the screen.
  2. Go to the Websites & Domains tab and find the site’s domain name.
  3. Click Password-Protected Directories.
  4. Click Add Protected Directory.
  5. In the Directory name box, specify the path to the directory that you want to protect with a password.

    This can be any directory existing in the site, for example: /private. If the directory that you would like to protect has not yet been created, specify the path and the directory name – Plesk will create it for you.

  6. If you are using a Linux-based account, you can also protect your CGI scripts stored in the cgi-bin directory. To do this, leave ‘/’ in theDirectory name box and select the cgi-bin checkbox.
  7. In the Title of the protected area box, type a resource description or a welcoming message that your users will see when they visit the protected area.
  8. Click OK. The directory you specified will be protected.
  9. To add authorised users, click Add User.
  10. Specify the username and password that will be used for accessing the protected area. The password should be from 5 to 14 symbols in length. Click OK.

To add an authorised user of a protected directory:

  1. Go to the Websites & Domains tab and find the site’s domain name.
  2. Click Password-Protected Directories.
  3. Click on the name of the directory you need.
  4. Click the Add User icon.
  5. Specify the username and password that will be used for accessing the protected area. The password should be from 5 to 14 symbols in length.
  6. Click OK.

To change password for an authorised user of a protected directory:

  1. Go to the Websites & Domains tab and find the site’s domain name.
  2. Click Password-Protected Directories.
  3. Click on the name of the directory you need. A list of authorised users will open.
  4. Click on the user’s name.
  5. Specify the new password and re-type it for confirmation.
  6. Click OK.

To revoke a permission to access the protected directory from a user:

  1. Go to the Websites & Domains tab and find the site’s domain name.
  2. Click Password-Protected Directories.
  3. Click on the name of the directory you need. A list of authorised users will open.
  4. Select a checkbox corresponding to the user’s name.
  5. Click Remove. Confirm the operation and click OK.

To remove password protection and make the resource available to the public:

  1. Go to the Websites & Domains tab and find the site’s domain name.
  2. Click Password-Protected Directories.
  3. Select a checkbox corresponding to the name of the directory from which you want to remove protection.
  4. Click Remove Protection. The protection will be removed and the contents of the directory will be accessible to the public without restrictions.

Watch the Video Tutorial

How to Reduce SPAM and Protect your Reputation

Dealing with email sent to non-existent mailboxes

Screen Shot 2015-06-03 at 12.28.22

Reducing SPAM and protecting your email reputation is an ongoing project, your job is never done. There are however some tricks, and this is one of them.

Spammers send emails to non-existent email addresses all the time. It’s part of their strategy. Here’s why.

Let’s imagine you have setup a mailbox for your domain, john.doe@yoursite.co.uk.

All email sent to john.doe@yoursite.co.uk will arrive at your inbox. So far, so good. So… What happens to emails sent to test@yoursite.co.uk?

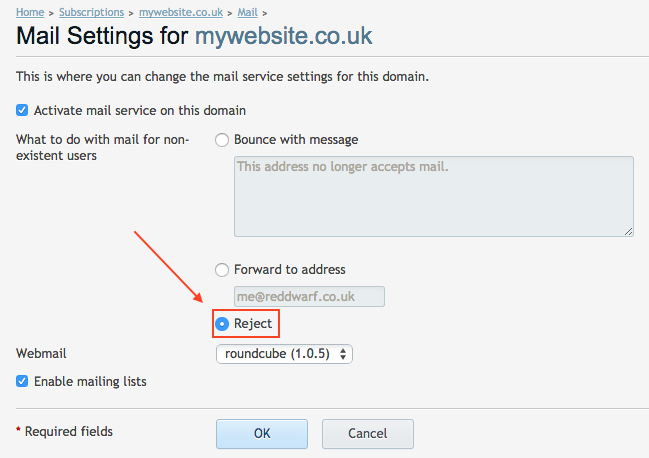
This is determined in your Mail Settings in the Plesk panel. There’s three options.

1) Catch-all method: If you have setup a catchall to john.doe@yoursite.co.uk, then emails sent to test@yoursite.co.uk (and in fact any email for anyone@yoursite.co.uk) will arrive in your inbox – it won’t take long to fill this mailbox with this catchall email spam.

2) Forward to address method: To prevent john.doe@yoursite.co.uk filling up with spam, you may choose to send all your spam emails to an old Gmail account, john.doe@gmail.com. Great, no spam for your john.doe@yoursite.co.uk mailbox! Well, not so great i’m afraid. This is potentially disastrous. Now Google will receive all your spam, sent from @yoursite.co.uk – it won’t be long before your domain name and IP are blocked on the global blacklists. A nightmare to clear up.

Here’s the solution you have been waiting for.

3) Reject method: Using this method, the spam emails are not delivered at all. The connection attempt is rejected at the SMTP server level. No email to deliver, no email to bounce. This is the recommended and best method for dealing with emails sent to non-existent mailboxes – and it’s really easy to do.

Time to login to your Plesk Panel and set this up

Screen Shot 2015-06-17 at 14.57.31

This will not eliminate all SPAM emails, nor will it guarantee your domain/IP will never be blacklisted, but, it definitely helps. If you do not “Reject” then SPAM and blacklisting is eventually inevitable.

Google Has Started Giving A Ranking Boost To HTTPS/SSL Sites

It’s official. Every site needs SSL. If you do not have SSL, it’s time to get it.

GoogleSSLAdding HTTPS to your website using a 2048 bit SSL certificate will cause Google to give your site a “ranking boost” against your non-SSL counterparts.

To be exact, Google said it carries “less weight than other signals such as high-quality content.” Based on their tests, Google says it has an impact on “fewer than 1% of global queries” but said they “may decide to strengthen” the signal because they want to “encourage all website owners to switch from HTTP to HTTPS to keep everyone safe on the web.”. This was announced by Google last year and there are signs that this signal is strengthening.

We all know how important security is. Prior to Google’s “HTTPS Everywhere” drive, there were more generic reasons why you would need to install SSL.

  • eCommerce web sites definitely needed SSL. Your customers will no doubt enter personal information (such as name, address, email) to sign up to your service. Even if you do not accept payments on your site and use an external payment provider, it is still essential that you protect your customers personal data and passwords.
  • Sites with a login form that require a username and password. Any site that requires a visitor to login – such as WordPress, Joomla, Drupal or a community Forum. Why? Because generally people use the same password across many sites (I know, it’s bad, but they do) and you have to protect their details from being leaked. As time progresses, people will simply avoid sites that do not use SSL/HTTPS.
  • Sites with forms where visitors would type personal information. If you have a contact form where visitors will type their name, address, telephone and email then an SSL with protect their data. You are more likely to get leads if you use SSL.

We Make Requisition and Installation of SSL Easy

You quite likely do not have the time or inclination to work out what you need to do to acquire, install and activate SSL on your website. That’s where we come in. All you need to do is order the certificate.

We will generate the CSR, acquire the SSL certificate and Install/Activate it. You do not need to do anything. It’s time to boost your site ranking and protect your visitors.

red_ordernow

Plesk 12 – Setting Up Your Email

How to Setup Email Services for your Web Site

Screen Shot 2015-06-03 at 12.28.22Your Web Hosting Service comes equipped with the very latest in email technology. It’s very easy to use if you use the RoundCube Webmail service as you do not need to configure or install anything.

However, many clients prefer to use their own local email client and for this reason we have created a number of setup guides for the most popular applications.

Microsoft Outlook

Microsoft Outlook Express

Mozilla Thunderbird

Apple Mail

Apple iPhone or iPad

Email Port Settings