UKC01 – Upgrade to Plesk Obsidian

Security, Performance and Feature Enhancements

We are pleased to announce that all hosting accounts that reside on UKC01 (Plesk 12) will be upgraded to the very latest Plesk Obsidian panel between 1800 Friday 4th and 0400 Sunday 6th December. There will be no disruption to your service.

Plesk Obsidian brings a whole suite of new features as well as the highest level of security and performance. In addition to the panel and base operating system upgrade your server hardware will be upgraded to the latest generation equipment thus delivering the highest performance for your web hosting services.

Access to the Plesk panel and the recommended name servers remain unchanged:

Panel access: https://ukc01.uk:8443
Nameserver 1: ns.ukc01.uk
Nameserver 2: ns2.ukc01.uk

The web server IP address will change from 109.75.167.56 to 195.224.99.181. If you use your own name servers (i.e. not the recommended name servers ns.ukc01.uk and ns2.ukc01.uk) then please ensure you change your DNS A records to use the new IP address within 7 days.

In the event that you have a problem with your web site service or you feel the migration of some of your data may need further attention please do not hesitate to contact the Helpdesk, advise of the specific problem you are experiencing and we will resync your data without delay.

We hope you enjoy the enhanced performance and security of your new UKC Plesk Obsidian Server.

UKC04 – Upgrade to Plesk Onyx

Security, Performance and Feature Enhancements

We are pleased to announce that all hosting accounts that reside on UKC04 (Plesk 12) will be upgraded to the very latest Plesk Onyx panel between 2200 Friday 31st May and 0400 Saturday 1st June. There will be no disruption to your service.

Plesk Onyx brings a whole suite of new features as well as the highest level of security and performance. In addition to the panel and base operating system upgrade your server hardware will be upgraded to the latest generation equipment thus delivering the highest performance for your web hosting services.

Access to the Plesk panel and the recommended name servers remain unchanged:

Panel access: https://ukc04.uk:8443
Nameserver 1: ns.ukc04.uk
Nameserver 2: ns2.ukc04.uk

The web server IP address will change from 5.77.35.251 to 5.77.32.80. If you use your own name servers (i.e. not the recommended name servers ns.ukc04.uk and ns2.ukc04.uk) then please ensure you change your DNS A records to use the new IP address within 7 days.

In the event that you have a problem with your web site service or you feel the migration of some of your data may need further attention please do not hesitate to contact the Helpdesk, advise of the specific problem you are experiencing and we will resync your data without delay.

We hope you enjoy the enhanced performance and security of your new UKC Plesk Onyx Server.

How to: Setup IMAP using Microsoft Office Outlook 2016

This guide is for setting up IMAP in Outlook 2016 to access your mail, IMAP is recommended if you are checking mail on multiple devices and wish to store your mail on the server.

If you will be checking mail on one device and wish to store copies of mail on your device and not on the server please follow the link below to view our guide on how to setup POP in Outlook 2016:

Outlook 2016 POP setup guide

  1. Open Microsoft Office Outlook 2016
  2. Go to File > Info > Add Account
  3. Select the checkbox Manual setup or additional server types. Click Next.

Outlook 2016 Step 3

  1. Select the option POP or IMAP and hit Next.

step 4

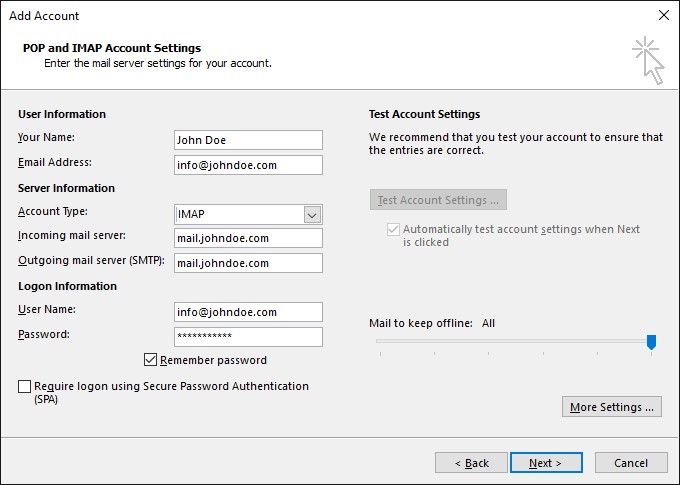
  1. Specify the following:
  • Your Name.
  • The email address that you are setting up the IMAP account for.
  • Account Type: IMAP
  • Incoming mail server: Enter mail.yourdomainname.com, for example if your domain name is johndoe.com please enter mail.johndoe.com.
  • Outgoing mail server: Enter mail.yourdomainname.com, for example if your domain name is johndoe.com please enter mail.johndoe.com.
  • User Name: Specify your full email address. Example: info@johndoe.com.
  • Password: This will be the password that you set when creating the mail account in Plesk, it is the password that you use to login to RoundCube webmail.
  • Require logon using Secure Password Authentication (SPA). Leave this option cleared.

step 5 imap

  1. Click More Settings, open the Outgoing Server tab and check My outgoing server (SMTP) requires authentication.

Step 6

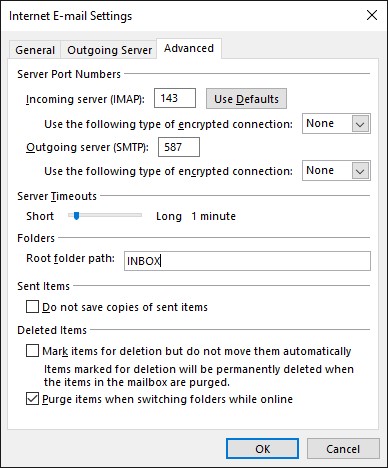
  1. Open the Advanced tab and enter 587 as Outgoing Server (SMTP) port and INBOX as the Root folder path. Click OK and Click Next to complete the setup.

step 7 imap

How to: Setup POP using Microsoft Office Outlook 2016

This guide is for setting up POP in Outlook 2016, POP is recommended if you will be checking mail on one device and wish to store copies of mail on the device and not on server.

If you will be checking mail on multiple devices please follow the link below to view our Outlook 2016 IMAP guide:

Outlook 2016 IMAP setup guide

To setup a POP account:

  1. Open Microsoft Office Outlook 2016
  2. Go to File > Info > Add Account
  3. Select the checkbox Manual setup or additional server types. Click Next.

Outlook 2016 Step 3

  1. Select the Option POP or IMAP and hit Next.

step 4

  1. Specify the following:
  • Your name.
  • The email address that you are setting up the POP account for.
  • Account Type: POP3
  • Incoming mail server: Enter mail.yourdomainname.com, for example if your domain name is johndoe.com please enter mail.johndoe.com.
  • Outgoing mail server: Enter mail.yourdomainname.com, for example if your domain name is johndoe.com please enter mail.johndoe.com.
  • User Name: Specify your full email address. Example: info@johndoe.com.
  • Password: This will be the password that you set when creating the mail account in Plesk, it is the password that you use to login to RoundCube webmail.
  • Require logon using Secure Password Authentication (SPA). Leave this option cleared.

step 5

  1. Click More Settings, open the Outgoing Server tab and check My outgoing server (SMTP) requires authentication.

Step 6

  1. Open the Advanced tab and enter 587 as Outgoing Server (SMTP) port. Click OK and Click Next to complete the setup.

step 7


How to: Transfer your Web Site to UKC

transfer-iconTransferring your Web Site to UKC without Downtime

Moving your site from an old host to a new host might sound complicated but it is actually very easy.

Our technicians are moving all types of sites (self built, WordPress, Joomla, shopping carts) on a daily basis. Leave the complexity to us.

We will help you transfer your web site, data and mysql databases to our hosting service and minimise (if not eliminate) the need for any downtime whatsoever.

Here are the steps to follow:

  1. Order your new hosting plan from UKC. Do not cancel your old hosting plan (yet).
  2. Is your old host using Plesk? If so, all you need do is run a full backup in Plesk Backup Manager and provide us with the backup file. We can restore from here.
  3. You will now have access to two hosting accounts.

What we need from you

In order for us to successfully transfer your website, we need the following:

  1. A backup of your hosting account run from your old host (if you have one)
  2. The panel login details of your old hosting plan
  3. The FTP details of your old hosting plan
  4. If you have SSH with the old host, then these details can also help

From here we can take care of the transfer of all of your site data and databases.

Going live without downtime

We will transfer all of your web site, data and mysql databases before the “going live” date which we will agree with you beforehand.

Once we go live, the switch will simply be a name server change on your domain name. At this point, your web site will now be live using a UKC hosting plan. Once you are happy with the operations of your new site you can then proceed to cancel your old hosting plan.

If you have any questions now (or along the way) simply contact the Helpdesk who are there to help.