Your website is the digital front door to your business. But what happens when that door closes and you don’t even know it?
PingSentry is a comprehensive website monitoring service designed specifically for businesses like yours – offering uptime monitoring, SSL certificate protection, and domain expiry alerts all in one simple dashboard.
Why Your Business Needs Website Monitoring
Every minute your website is down costs your business money, trust, and customers:
Lost Sales: The average small business loses $200 per hour during downtime
Security Warnings: Expired SSL certificates trigger “Not Secure” browser warnings, causing customers to abandon their carts immediately
Domain Disasters: An expired domain means your website, email, and business identity can disappear overnight – or worse, be stolen by domain squatters
Three Essential Monitors Every Business Needs
1. Uptime Monitoring
Checks your website every minute, 24/7
Instant email alerts the moment your site goes down
See your complete uptime history at a glance
99.9% of downtime caught within 60 seconds
2. SSL Certificate Protection
Monitors SSL certificate expiry dates
Alerts you 30 days before certificates expire
Supports custom SSL ports (Plesk, cPanel)
Protects your revenue, reputation, and Google rankings
3. Domain Expiry Alerts
Tracks domain expiration dates automatically
Multiple reminder alerts so you never forget
Works for .com, .co.uk, and 100+ TLDs
Prevents costly domain loss and squatting
Setup is Ridiculously Simple
Add Your Website – Enter your URL (takes 30 seconds, no code required)
We Monitor Everything – Automated checks run 24/7 across all three critical areas
Get Instant Alerts – Receive email notifications the moment something goes wrong
No IT team required. No plugins. No complicated setup.
Pricing That Makes Sense
Free Forever Plan
5 monitors
5-minute checks
Email alerts
1 public status page
Perfect for single-website businesses
No credit card required
Join Thousands of Businesses Already Protected
PingSentry is trusted by small businesses worldwide to keep their websites online, secure, and accessible. Our customers have prevented countless hours of downtime and protected millions in revenue.
Start protecting your business today – it takes just 2 minutes to set up, and our Free plan never expires.
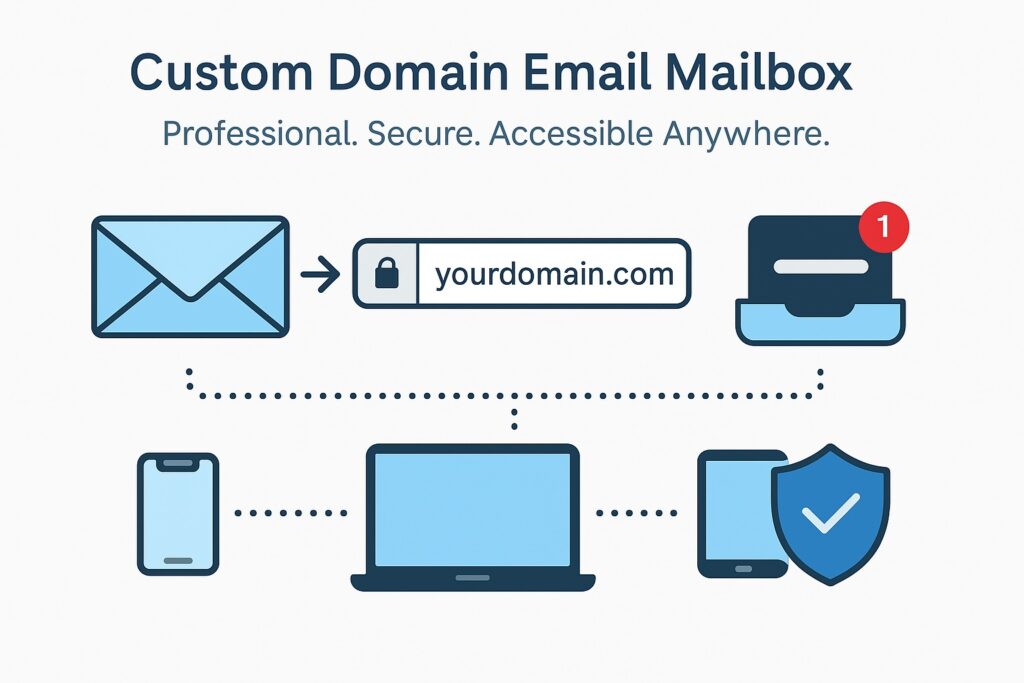
1. What is a Custom Domain Email Address / Mailbox?
A Custom Domain Email Address (or mailbox) is an email account that uses your own website’s domain name instead of a generic email provider like Gmail or Yahoo. For example, instead of john.doe@gmail.com, you would have john.doe@yourdomain.co.uk.
This mailbox lets you send and receive emails using your custom domain, giving you greater control and professionalism.
How is this different from full email hosting?
A mailbox provided with your domain offers basic email capabilities, typically accessed via webmail or configured in email clients using POP or IMAP protocols. Full email hosting services usually provide additional features like calendars, contacts, advanced spam filtering, and larger storage limits.
Why use a domain email address?
Professionalism: Using a custom domain email looks more credible and trustworthy to your clients and contacts.
Branding: Every email you send promotes your brand and reinforces your online presence.
Control: You manage your email addresses and accounts, not a third-party free provider.
Customisation: Create personalised addresses like sales@yourdomain.co.uk or info@yourdomain.co.uk tailored to your business needs.
2. How to Get a Mailbox?
If you have a parked domain using our default nameservers, you’re eligible for a custom domain mailbox.
Enter your full email address (e.g., john.doe@yourdomain.co.uk) and password to log in.
Once logged in, you can send, receive, and manage your emails from anywhere with internet access.
Using Third-Party Email Clients
We recommend using Roundcube Webmail to send and receive emails through your mailbox, however, if you are up for the technical challenge then you might prefer to use unsupported desktop or mobile email applications like Microsoft Outlook, Thunderbird, or Apple Mail, you can configure them with the following settings:
Incoming Mail Server (IMAP): microlite1.com
Port: 993 (SSL/TLS)
Incoming Mail Server (POP3): microlite1.com
Port: 995 (SSL/TLS)
Outgoing Mail Server (SMTP): Use your Internet Service Provider’s SMTP server
Username: Your full mailbox name (e.g., john-doe-yourdomain-co-uk)
Password: Your mailbox password
Note: IMAP keeps your emails synced across all devices, while POP downloads emails to your device.
Mobile Access Tips
Use the built-in mail apps on your iPhone, Android, or tablet.
Enter the same server settings as above for IMAP or POP.
For quick access without setup, simply use Roundcube webmail via your mobile browser.
4. Setting or Resetting Your Mailbox Password
How to Change Your Mailbox Password
You can easily change your mailbox password anytime through your client area:
Choose an upgrade option to a higher storage plan.
Complete the upgrade process – your storage will increase immediately or within a few minutes.
Contact support if you need assistance with upgrading.
6. Spam Protection and Security
Spam Filtering with SpamAssassin
To help keep your mailbox clean and free from unwanted junk emails, we use SpamAssassin, a powerful spam filtering system running on our mail servers.
Incoming emails are automatically scanned and scored for spam-like characteristics.
Emails identified as spam are marked or moved to a spam/junk folder, helping you focus on important messages.
Malware Scanning with Maldet
In addition to spam filtering, we employ Maldet (Malware Detect) to scan all email attachments for malware and viruses.
Suspicious or harmful attachments are flagged or blocked to protect your device and data.
How to Report Spam or Phishing Emails
If you receive a suspicious email that bypasses the filters:
Do not open attachments or click links in the email.
Forward the email to our support team at abuse@uk-cheapest.co.uk with the subject “Spam/Phishing Report.”
Delete the email from your mailbox after reporting.
7. Configuring Email Forwarding
How to Forward Emails from Your Domain Email Address
If you have a parked domain using our default nameservers, you can easily forward emails sent to your domain’s aliases to any external mailbox of your choice. This is perfect if you want emails addressed to info@yourdomain.co.uk or sales@yourdomain.co.uk to be redirected to your main mailbox or another email account.
If you’ve lost access to your UK Cheapest account – whether due to forgotten login details, a changed email address, or a problem with two-factor authentication (2FA) – don’t worry. We’re here to help you regain access as quickly and securely as possible.
What To Do If You Can’t Log In
If you’re unable to access your account for any reason, please open a support ticket using our Create New Support Request form. This option is designed for clients who:
Fill in the required details – be sure to include as much information as possible about your account (such as domain names, old email addresses, or past invoice numbers).
Submit the form to reach our helpdesk team.
You’ll receive a reply via email, even if the email address isn’t currently linked to your account.
Our support team may ask for additional verification to ensure your account remains secure. Once verified, we’ll help you restore access or update your login credentials.
Keeping Your Account Secure
We take account security seriously. That’s why identity verification is required before any changes can be made. Your patience and cooperation help protect your services from unauthorised access.
If your website is still running on PHP 7.x or 8.0, it’s time to take action. These versions are no longer supported and no longer receive security updates, which means your site could be vulnerable to attacks and compatibility issues.
The minimum safe version today is PHP 8.1, but for the best performance and long-term security, you should be using PHP 8.2 or 8.3.
Benefits of upgrading:
• Improved speed and performance • Enhanced security features • Full compatibility with modern software and frameworks
Not sure which version your website is using, or how to upgrade? Feel free to get in touch or leave a comment.
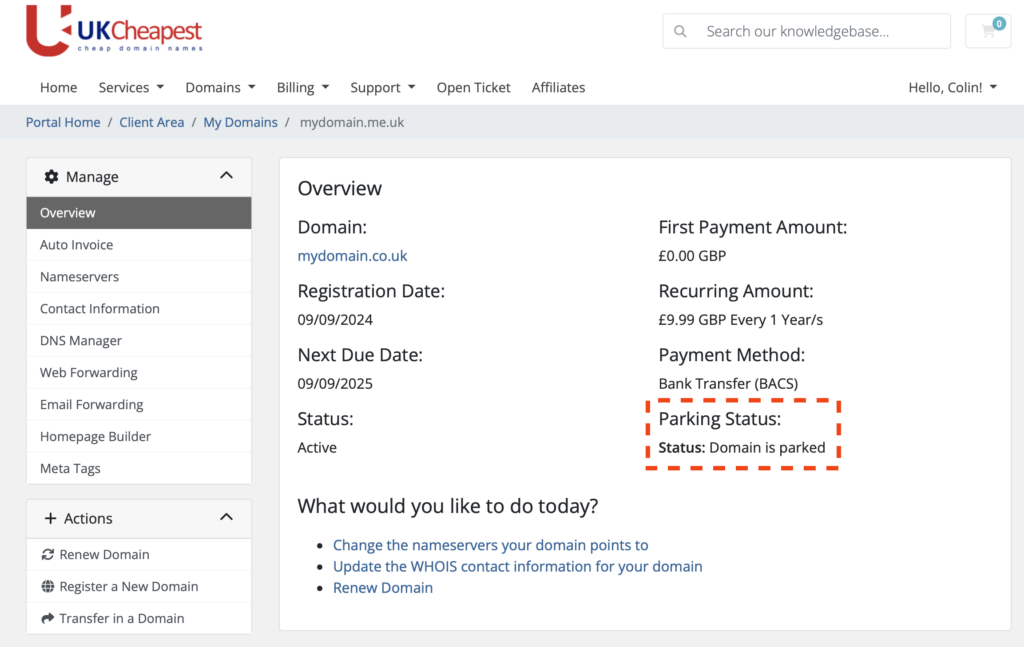
When you manage your domains, you may see a Parking Status displayed, such as:
Status: Domain is parked
Status: Domain is not parked
What Does “Domain is Parked” Mean?
A parked domain means your domain name is using our default nameservers (ns.microlite1.com and ns2.microlite1.com). While parked, you can use our free parking tools such as:
If you see “Domain is not parked“, your domain is pointing to external nameservers. This means our local parking tools, including email and web forwarding, will not be available for your domain until you switch back to our parking servers.
View the Parking Status on the domain overview page.
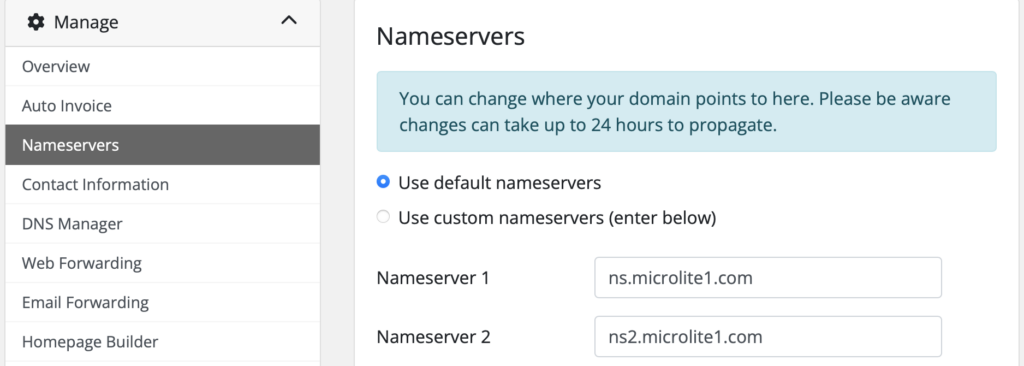
How to Park or Unpark Your Domain
To park your domain and enable our free tools, select Use default nameservers then hit Change Nameservers button. This updates your domain’s nameservers to:
ns.microlite1.com
ns2.microlite1.com
To unpark, simply point your domain to any external nameservers of your choice. Note that parking features will then be disabled.
If you need help changing your domain’s nameservers or have questions about parking, please contact our support team.