Fairer, Smarter Hosting Plans – 2025 Pricing

At UKC, we remain committed to delivering reliable, high-performance hosting – backed by real UK-based support and honest pricing.

We’ve held prices steady for over 18 months, and in many cases, some clients have benefited from legacy pricing unchanged for 5+ years. We’re proud to have offered that stability through a period of rising operating costs across hardware, power, licensing, and software infrastructure.
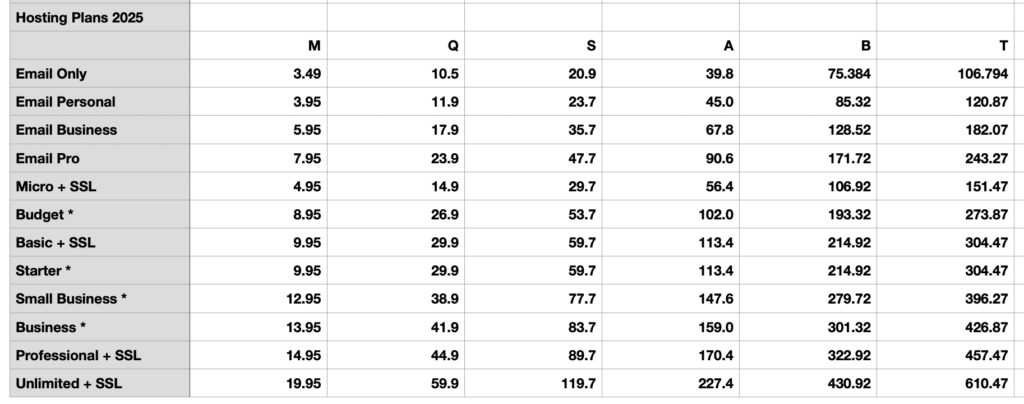
What’s Changing?

Starting 1st September 2025, we are applying a modest update to our hosting plan prices to reflect current costs and ensure we can continue to maintain and improve the quality of service you expect.

We understand that for some clients – especially those who’ve been with us for many years – the new pricing may feel like a big jump. That’s only because we’ve worked hard to lock in your original rates for as long as possible, often holding them steady for 5+ years, even as our own costs increased. This update is simply a reflection of the real cost of delivering secure, supported hosting in 2025 – and we’re still keeping our prices below those of most UK competitors.

If the new rate feels out of reach, don’t worry – we’re here to help. We can offer a one-time discount, a custom plan review, or a flexible billing option to suit your needs.

As always:

  • All clients can still choose from monthlyquarterly, or long-term billing options (with up to 15% discount on longer-term renewals).
  • We’ve kept our price tiers in line with major UK hosting providers – often offering better value by including unlimited emails, multiple sites, and our website builder at no extra charge.

What If You’re On a Legacy Plan?

You don’t need to do anything – legacy plans will continue at their current rate until renewal, or unless you upgrade/downgrade.

If you’d like to:

  • Lock in your new rate with up to 3 years of discounted renewal
  • Review your current usage to see if a lower-cost plan suits you
  • Switch to monthly billing for affordability

…we’re happy to help – just open a support ticket and our team will guide you.

Thank You

Thank you for being a valued part of the UKC hosting community. Your support allows us to continue delivering fast, secure, and personal hosting – without hidden fees or impersonal service.

We’re proud to host your websites and email, and we look forward to supporting your success in 2025 and beyond.

Find the Perfect Website Package for Your Business – DIY or Done-For-You

Launching or upgrading your website is a key step to growing your business online. At UK Cheapest, we offer four tailored website packages designed to suit different needs, skill levels, and budgets – from simple DIY solutions to fully managed professional sites.


1. Domain + Free Builder – Simple & Affordable DIY Start

This package is perfect if you’re just starting out and want an easy, budget-friendly way to get online.

  • What it includes: Register a domain name and get a free one-page website builder included. You can create your own site quickly and manage optional add-ons like custom email or SSL security on your own.
  • Who it’s for: Small businesses, startups, or individuals comfortable managing their own site basics. Ideal if you want minimal costs and hands-on control.
  • Price: Around £10/year for the domain, no hosting fees unless you add extra services.

2. Hosting + SiteJet Builder – DIY Multi-Page Flexibility

Step up to a multi-page website with hosting included, featuring the SiteJet drag-and-drop website builder.

  • What it includes: Hosting with SSL security, access to 140+ customizable templates, and an easy-to-use builder similar to Wix. You get full control over design and updates.
  • Who it’s for: Businesses needing more pages and flexibility but wanting to keep control of their website creation and updates. Great for those who want a professional look without ongoing management fees.
  • Price: Starting from £50/year.

3. Managed One-Page – Stress-Free Lead Generation

Want a professionally designed website but no time or interest in managing it yourself? This fully managed package is designed for you.

  • What it includes: We build a tailored one-page website optimized for lead generation. Hosting, SSL, backups, updates, and ongoing support are included — you just focus on your business.
  • Who it’s for: Busy entrepreneurs or small businesses who want an attractive, effective online presence with zero tech hassle.
  • Price: From £29/month.

4. Managed Multi-Page – Full-Service Website Solution

For businesses ready to grow with a robust, multi-page website designed and managed by professionals.

  • What it includes: Custom multi-page site with expert design, hosting, SSL, backups, ongoing updates, and dedicated support. Perfect for those who want the best without lifting a finger.
  • Who it’s for: Established businesses or startups planning to expand their online footprint and brand credibility with a comprehensive website.
  • Price: From £49/month.

Which Package Is Right for You?

Your choice depends on your budget, time, and how involved you want to be:

  • Want hands-on control? Go for Domain + Free Builder or Hosting + SiteJet Builder.
  • Prefer experts to handle it all? Choose a Managed One-Page or Managed Multi-Page solution.

No matter what you pick, UK Cheapest supports your online success with quality, reliability, and value.

Are you still running your website on PHP 7.x or 8.0?

If your website is still running on PHP 7.x or 8.0, it’s time to take action. These versions are no longer supported and no longer receive security updates, which means your site could be vulnerable to attacks and compatibility issues.

The minimum safe version today is PHP 8.1, but for the best performance and long-term security, you should be using PHP 8.2 or 8.3.

Benefits of upgrading:

• Improved speed and performance
• Enhanced security features
• Full compatibility with modern software and frameworks

Not sure which version your website is using, or how to upgrade? Feel free to get in touch or leave a comment.

How to Install WordPress on Plesk Obsidian: A Beginner’s Guide

Installing WordPress on your UK Cheapest Plesk Obsidian server is incredibly easy, even if you’re new to web hosting. With Plesk’s user-friendly interface, you can set up WordPress in just a few clicks. Follow this guide to get your WordPress site up and running!

Step 1: Log In to Your Plesk Control Panel

Start by logging into your Plesk Obsidian control panel. You’ll find the login details in the welcome email from UK Cheapest, or you can log in at:

URL: https://your-domain.com:8443

Enter your username and password to access the dashboard.

Step 2: Go to the WordPress Toolkit

Once inside the Plesk dashboard, find the WordPress Toolkit on the left-hand menu. The WordPress Toolkit makes it simple to install, manage, and update your WordPress sites.

If you don’t see the WordPress Toolkit, navigate to Extensions in the menu and install the WordPress Toolkit extension for free.

Step 3: Install WordPress

With the WordPress Toolkit open, follow these steps to install WordPress:

  1. Click on Install WordPress in the top right corner.
  2. Select your domain or subdomain from the dropdown where you want to install WordPress.
  3. Choose installation path (leave blank if you want WordPress to be installed in the root directory of your domain).
  4. Under Installation Settings, enter your site title, admin username, password, and email. These will be used to log in to your WordPress dashboard.
  5. For security, make sure Enable HTTPS is checked if you have an SSL certificate installed. This will ensure that your site uses HTTPS.
  6. Click Install.

The installation process will begin, and within a few moments, your WordPress site will be ready!

Step 4: Access Your WordPress Admin Dashboard

Once WordPress is installed, you can access your WordPress admin dashboard:

  • In the Plesk dashboard, navigate to the WordPress Toolkit.
  • Under the list of installed WordPress sites, find your domain.
  • Click on the Log in to Admin Dashboard button. This will take you directly to the WordPress admin panel.

You can also access your dashboard by going to https://your-domain.com/wp-admin and entering your WordPress admin username and password.

Step 5: Customise Your WordPress Site

Now that you’re inside the WordPress dashboard, you can start customising your site:

  • Choose a theme by going to Appearance > Themes.
  • Install plugins by navigating to Plugins > Add New.
  • Create pages and posts from the Pages and Posts sections.

WordPress gives you complete control over your site, and with Plesk’s toolkit, managing updates, plugins, and security is easy.

Step 6: Enable Automatic Updates (Optional)

To keep your site secure and up to date, you can enable automatic updates for WordPress core, themes, and plugins:

  1. In the Plesk WordPress Toolkit, find your site and click Manage.
  2. Under Updates, enable automatic updates for WordPress core, plugins, and themes if desired.

If you haven’t already enabled SSL during the WordPress installation, you can do so now to secure your site with HTTPS:

  1. Go to Websites & Domains in the Plesk dashboard.
  2. Click on SSL/TLS Certificates under your domain.
  3. Select Let’s Encrypt to issue a free SSL certificate for your site.
  4. Once installed, Plesk will automatically configure your site to use HTTPS.

Congratulations! Your WordPress Site is Ready

That’s it! You’ve successfully installed WordPress on Plesk Obsidian. From here, you can start customising your site, installing plugins, and adding content. Thanks to Plesk’s easy-to-use interface, managing your WordPress site will be smooth and efficient.

Need further help? Don’t hesitate to reach out to our support team for assistance!

Mail Autodiscover Feature in Plesk Obsidian for Linux

The Mail Autodiscover feature in Plesk Obsidian for Linux is designed to simplify the process of configuring mail clients, such as Outlook, Thunderbird, and mobile devices. It automatically detects and configures the email server settings (IMAP, POP, SMTP) for a domain’s mail accounts, reducing manual input.

Key Points about the Mail Autodiscover Feature

1. Purpose of Autodiscover

The autodiscover feature helps end-users by automatically setting up their mail clients without the need to manually enter server settings (such as the IMAP/POP and SMTP server names, ports, and security settings). It simplifies email account configuration by automatically supplying the correct mail server details based on the user’s email address.

2. How Autodiscover Works

When a user adds their email account to a mail client, the client sends an Autodiscover request (usually to autodiscover.domain.com or domain.com/autodiscover/autodiscover.xml) to fetch the server configuration. The mail client receives the necessary settings, such as:

  • Incoming mail server (IMAP or POP).
  • Outgoing mail server (SMTP).
  • Port numbers and security settings (SSL/TLS).
  • Username and other optional settings.

3. Autodiscover for Domains in Plesk

In Plesk, Autodiscover is enabled by default for email services and can be managed per domain. Plesk creates DNS records for autodiscover.yourdomain.com and related services during domain setup to enable mail autodiscovery.

4. Protocols Supported by Plesk Autodiscover

IMAP, POP3, and SMTP server settings are supplied by the Autodiscover feature. It also supports SSL/TLS settings for secure mail communication.

5. DNS and SRV Records for Autodiscover

To ensure that Autodiscover works properly, Plesk creates DNS SRV records for the domain’s mail service. These records point mail clients to the correct servers for IMAP/POP and SMTP. The typical DNS SRV records created for Autodiscover are:

  • _autodiscover._tcp.yourdomain.com
  • _imaps._tcp.yourdomain.com
  • _pop3s._tcp.yourdomain.com
  • _smtps._tcp.yourdomain.com

6. Supported Mail Clients

Autodiscover works with various popular mail clients that support this feature, such as:

  • Microsoft Outlook (for automatic email account setup).
  • Mozilla Thunderbird.
  • Apple Mail.
  • Mobile devices like Android and iOS.

7. SSL/TLS and Autodiscover

Plesk ensures that mail autodiscovery can work over secure connections. When properly configured, clients will receive SSL/TLS settings, ensuring that the email communication is encrypted.

8. Customising Autodiscover

If you need to adjust or customise the Autodiscover behavior in Plesk (for instance, for a different domain setup or custom mail server), you can modify the DNS SRV records or Autodiscover configuration.

9. Troubleshooting Autodiscover

If Autodiscover is not working correctly:

  • Verify that the correct DNS SRV records are in place.
  • Ensure that your mail server’s SSL certificates are correctly configured.
  • Check your firewall settings to make sure the mail ports (IMAP/POP and SMTP) are open.
  • Test using the Microsoft Remote Connectivity Analyser to see if Autodiscover is working for your domain.

10. Enabling/Disabling Autodiscover

In some cases, you may want to disable Autodiscover for specific domains. You can do this by removing or adjusting the DNS records in the Plesk DNS settings.

Example of an Autodiscover SRV Record in Plesk

Here is an example of how an SRV record for autodiscovery might look in Plesk:

ServiceProtocolPriorityWeightPortTarget
_autodiscover_tcp00443autodiscover.yourdomain.com
_imaps_tcp00993mail.yourdomain.com
_smtps_tcp00465mail.yourdomain.com

How to Enable/Manage Autodiscover in Plesk

1. DNS Setup

Go to Domains > DNS Settings and ensure that the correct SRV and A records for Autodiscover are present.

2. Mail Server Settings

Ensure your mail server (Postfix/Dovecot) is correctly configured to support Autodiscover. You can check mail server settings in Tools & Settings > Mail Server Settings.

3. SSL Configuration

Ensure that SSL certificates for the mail server and Autodiscover domain are valid and properly set up.

Conclusion

The Mail Autodiscover feature in Plesk Obsidian for Linux simplifies the setup of email accounts by automatically detecting mail server settings and configuring mail clients accordingly. It works with popular clients like Outlook and Thunderbird and relies on DNS SRV records and proper mail server configurations. To ensure it works, ensure correct DNS, mail server, and SSL setups.